Kat Eye Studio

  • Home
  • Portfolio
  • Books
    • Art with an iPhone
    • Digital Photography for Beginners
  • Workshops
    • Mobile Photography Workshop Series
    • iPhone Art Workshop
    • Out of the Box Composition Workshop
    • Photography & Creativity Talks
  • Free Resources
    • Mobile Tutorials
    • Exploring with a Camera
    • Liberate Your Art Postcard Swap
  • Blog
  • About
    • Artist Statement
    • Background & Experience
    • Contact

December 16, 2011 by Kat

Exploring with a Camera: Creative Lights

Holiday time = long, dark nights + lots of lights, at least in the northern hemisphere. It’s the perfect time to explore! We’re continuing the recent “lights” theme of Exploring with a Camera with Creative Lights. I’m hoping that at least one, if not all, of these creative techniques will be new to you and will keep you exploring the lights at night for the remainder of the holiday season.

Let’s jump right in!


Layered Lights

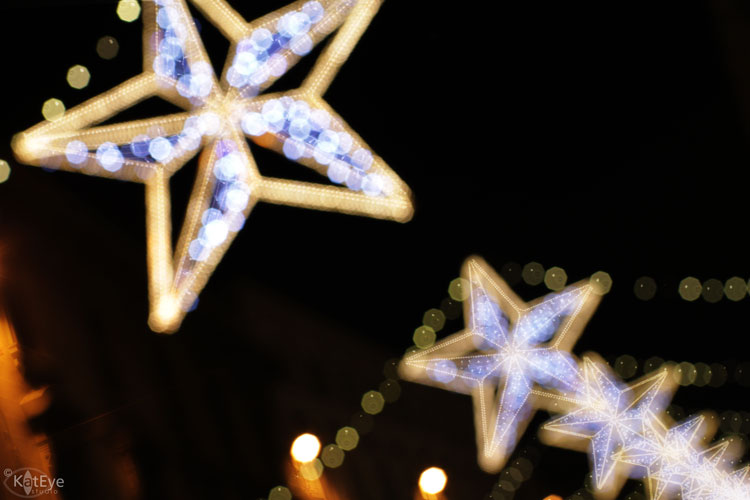
Take a look at the lead in photograph, it’s a little bit unusual. It’s a composite of two images, one in-focus and one out-of-focus, creating a neat effect I am calling “Layered Lights.” I discovered this technique on my own last year, when I was looking for new ways to capture the lights in Monza. Seeing the out-of-focus and in-focus images side by side on the computer, I wondered what it would look like to combine them. Layered Lights was the result!

You will need a photo editing software that allows you to blend layers to do this, I use Photoshop Elements (PSE). I’ll show you how to created Layered Lights using this example image from Madrid, Spain. I think it looks great when you have a bit of architecture and lights, since the architecture grounds the image in a dreamy version of reality.

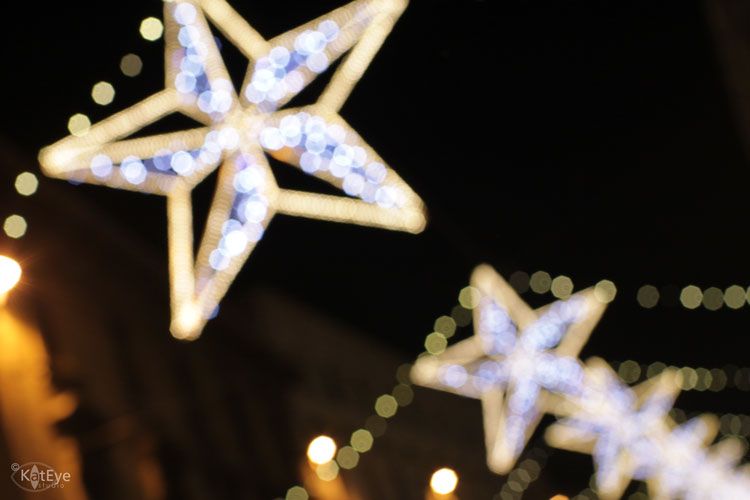
First, open the out-of-focus photo. That becomes your base image. Here’s the out of focus photo I used:

Next, open the in-focus photo and pull it into a layer above the out of focus photo. Here’s my in focus photo:

Now, play with blending modes and opacity of the top layer. Soft light and Overlay blending modes work particularly well. Unless you used a tripod when you captured the images, you may also have to transform (rotate, enlarge, reduce) your in-focus image to overlay the lights and the other elements in the correct locations on the out-of-focus image. It takes a bit of playing around, and I’ve discovered I like the in-focus photo slightly offset from the out-of-focus photo for a dreamier effect.

In the case of this photo example, the out-of-focus lights were also too bright – I couldn’t easily see the in-focus lights when I blended the layers, so I reduce the opacity of the out-of-focus layer and added a 50% grey layer underneath to get the final image:

Here’s what the layers look like in PSE:

Here’s a second example, of a really tall Christmas tree in the Madrid pedestrian zone, and the resulting layers in PSE:

Fun, huh? There are so many different ways you can play with this type of image blending… add more photos or layers, change the underlying layer, change the processing with other effects. Endless possibilities! If you don’t have your own images to try this with, feel free to download the out-of-focus and in-focus images I’ve shared above (right click and then “Save as…”) to play around with this technique. Just be sure to give photo credit and link back here if you share anywhere!


Zoom Lights

Can you tell what this is?

It looks like some really cool fireworks, or I had one friend tell me it looked like something out of the movie Tron. 🙂 This was captured by zooming (changing my focal distance) during a long exposure. Here are the actual lights I photographed:

To get this effect, you will need a zoom on your camera and the ability to set a long shutter speed. I found a shutter speed of 1 second worked very well. Set up your shot by starting zoomed in, fitting the lights just inside the frame. As you press the shutter, start zooming out (making the lights smaller) and keep the zoom moving through the exposure. The more you move the zoom during the exposure, the longer the lines of light will be. If you are shooting handheld, you will see some wiggle in the lines of lights. With practice and steadiness, you can minimize the wiggle or you can always use a tripod to get absolutely straight lines.

One tip to keep obvious “joggles” at the start or end of the lines, start your zooming motion just before you press the shutter and keep it going smoothly until after the shutter closes.

Have fun experimenting! As I’ve shared before, I find it especially interesting to capture people, I think it gives a cool time travel effect.


Hologram Lights

A couple of years ago we won a prize for the “worst white elephant gift” at a holiday party. The prize was well worth it, it was two pairs of these cool holiday hologram glasses, modeled here by my son.

What’s so cool about these? They change any point light source into a holographic image when you look through them. OR, when you photograph through them! The glasses shown in this example are the “Christmas Star” version, and here’s what our tree looks like, when photographed through the film of the glasses:

I love it! Someone could probably tell me how to do this with post processing, but all I did was hold the film of glasses right up to the lens, and shoot. So simple! You have to move the glasses around a little bit to get the best coverage of the lens since the opening in the glasses is smaller than the lens, but the paper around the edges gives a nice vignetting effect. If you are shooting up closer, I’ve found you need to focus on the lights to get the hologram effect, as I did here:

If you focus on another object, as I did with this ornament, the lights become blurry and you lose the hologram effect.

This doesn’t only work for Christmas lights, it will work for any point light source. Car headlights, streetlights, etc. become point light sources when viewed from far enough away. Lots of exploration fun! A quick google search for “Holographic Christmas Glasses” yielded a number of options. Here’s a link to a set of glasses with different hologram images on Amazon. I think I may have to get the set myself to play around some more, since they are so inexpensive and so very fun.

Also consider other films you can photograph through, for interesting effects. I can imagine that the thin, colored cellophane that gift baskets come in would give cool effects too!


So, what do you think, are you ready to go exploring Creative Lights? I’m excited already to see what you link in. I love how I can throw this information out there and get even more creative interpretations coming back from all of you. You can link in below or share in the Flickr pool. Happy light hunting!


FYI - Links will be moderated. Please use a permalink, ensure that your linked image is on topic, and include a link back to this site in your post through the Exploring with a Camera button (available on the sidebar here) or a text link. Thanks!

Filed Under: Exploring with a Camera, The Kat Eye View of the World Tagged With: holiday, home, Italy, lights, Milan, Monza, Oregon, photoshop, zoom

November 8, 2011 by Kat

Everything, and a Sink

And the Sink

Have you ever heard the phrase: Everything but the kitchen sink? This photo made me think: Everything and the kitchen sink. (Except it’s a bathroom sink. But it’s a sink so I hope you’ll spot me the flexibility in phrasing.)

I love the randomness of this collection. Another of my favorites from my outing to Philomath on Friday, I had much success finding photoographs along the outside of the Architectural Salvage store. I’ll have to go back and visit when it’s open sometime, I bet there are even more opportunities for random goodness to photograph inside.

All of the photos of this series have been edited using Lightroom 3, I’m now using Lightroom exclusively for my editing to learn the software. I’ve got my Scott Kelby book open on my lap and I’m flipping back and forth as I have questions. I’m learning a ton.

I am in love. Absolute, and total love, with Lightroom. What a fantastic piece of software for editing and organizing photos. It’s intuitive and powerful, and I’ve been in desperate need of the organization piece. I’m getting lost in all of the editing possibilities, and it’s just plain fun. I’m not sure why a photographer would bother with Photoshop! (OK, not totally true, I know I will still use Photoshop Elements for layers, but I’m enamored at the moment so I’m allowing myself to be dramatic.)

Here are a couple of videos I’ve watched that help explain why you would use one or the other, via Kent Weakley and Adorama TV. (The Adorama TV video is the one I watched first, and it helped me decide to go with Lightroom as my next software, but Kent’s is a nice overview and is shorter.) You can substitute “Photoshop Elements” for “Photoshop” in any of these conversations, both integrate with Lightroom the same way, I’ve found. How awesome is that?

Maybe, just maybe, with the combo of Lightroom and Photoshop Elements, I’ve discovered I have everything and the kitchen sink. I’m one happy gal.

Disclosure: Links to Amazon are affiliate links.

Filed Under: The Kat Eye View of the World Tagged With: flowers, lightroom, locker, Oregon, Philomath, photoshop, pot, texture

February 23, 2011 by Kat

The Next in the Series

OK, here it is. The third in the series I showed you yesterday. This is another image found on the streets of Parma. I’m toying with calling this series “Classic Italian” but we’ll have to see how it forms up. So far, it seems to be classic red vehicles on the streets of Italy near some sort of grocery crates. I don’t know if that will hold, but who would have thought I would have three of these? We’ll see what I find next week, when we visit Sicily.

The Exploring with a Camera: Breaking the Rule of Thirds link is now closed. The winner of the “C is for Camera” journal is Michelle, who goes by Pixie Dreams on Flickr. Congrats Michelle! Thanks so much to all who linked in, it was great to see all of these wonderful images. Don’t forget to visit Tammy Lee Bradley at Bliss and Folly to see who won the Vintage Camera trio.

Come back tomorrow for the next Exploring with a Camera post, this week we’re going to Capture the Sky!

Filed Under: The Kat Eye View of the World Tagged With: actions, bicycle, giveaway, Italy, market/wheels, Parma, photoshop, red, series, store display

February 22, 2011 by Kat

The Birth of a Series

Walking down a side street in Parma a couple of weekends ago, I happened on this lovely scooter. Of course I had to stop and photograph it, trying out several angles and compositions. Good thing it was a pedestrian zone, as I kneeled in the street for quite some time waiting for people to walk by so I could have an empty sidewalk. Every so often a scene like this will grab me, and not let go until it has its way with me. I’m always content to just follow the photographic muse when that happens.

When I got home, realization dawned on me. This image is the second in a series. Even though I didn’t plan it, the photo is a perfect complement to Where Fiats Retire, an image from Sorrento I shared a couple of months ago. Similar processing (read below for details) and I was good to go.

I’ve never had this happen before, an image come along months later that so perfectly pairs with an earlier shot. And not just any previous shot, a favorite. I loooooove that Fiat shot. Guess what? I looked through my images and there is another shot in the series, which I’ll share tomorrow. I wonder how many more are hidden there? Will they start appearing to me more often?

I guess this is how a series is born. I had no idea!

…………………………

A quick reminder – today is the last day to link in to Exploring with a Camera: Breaking the Rule of Thirds. Tomorrow morning I’ll draw for the winner of my giveaway as will Tammy at Bliss and Folly. Take a look at all of the wonderful images shared and be sure to link yours in too!

Photo processing in Photoshop Elements 8:
1. Cropped out some distracting info on the right edge.
2. Ran Pioneer Woman Seventies Action.
3. Added a Hue/Saturation Layer, and increased Hue to +5 and Saturation to +16 to increase the color of the  scooter back a little bit brighter.
4. The wall behind the scooter was too similar in color to the scooter, competing for attention. I added another Hue/Saturation Layer with Saturation set to -27, and used a layer mask to only apply this change to the red wall.

Here’s the original, straight out of the camera, for comparison:

Filed Under: The Kat Eye View of the World Tagged With: actions, Italy, market/wheels, Parma, photoshop, scooter, series, store display, street

January 30, 2011 by Kat

Altering our View

I am musing today on Applied Texture over at Mortal Muses, come by and say hello. This image was captured on our day trip to Sirmione last weekend, and I just loved the piece of the castle jutting out into the lake. Beautiful light and reflections, a reminder of an era gone by. Perfect for a little texture to age it.

I love digital photography, for the way it can alter our view. Here’s the original image, before the texture. A different feel, don’t you agree? Which do you like best?

Filed Under: The Kat Eye View of the World Tagged With: castle, Italy, lake, Lake Garda, photoshop, reflection, Sirmione, texture

December 21, 2010 by Kat

Star Light, Star Bright

On Saturday night, after a wonderful, cozy day in the house, we got ourselves out to go into Monza – I wanted to capture the lights. I must be honest, I wasn’t feeling too inspired by them. I know, shocking, but even with me sometimes that happens. So I played around with creating some intentional bokeh by shooting out of focus. It wasn’t until I got home and saw the two images  side-by-side in the computer, out of focus and in focus, that I really got excited. Sometimes something new just hits you out of the blue – I wondered if I could combine them for an interesting effect. What you see above is the result, and I love it.

Here’s how I did it…I started with the “out of focus” bokeh photo in Photoshop Elements, this one:

Then I pulled the “in focus” one in, this one, as a layer above the “out of focus” photo:
I combined them by using a blending mode of soft light, at 75%. Finally, I stretched and tilted and adjusted the “in focus” photo until the stars closely overlayed the “out of focus” ones. These were taken handheld, so while they were taken from the same location and angle with the same zoom, they are slightly different compositions and needed to be matched up. If I had used a tripod (heaven forbid!), I would not have needed this last step.
I tried lots of different blending modes and opacities, they all came out slightly different – the one I’m sharing today is the one I liked best. Let me know what you think!

I interrupt my regularly scheduled participation in 9 Muses Musing because I wanted to share this photo for Sweet Shot Tuesday and Touch Up Tuesday. And, to be honest, I also didn’t have anything specific in mind for today’s prompt of FAMILY. 🙂 Be sure to stop by and see all the other shared stories on FAMILY  at Mortal Muses though! Tomorrow’s prompt is CANDLE.

Filed Under: The Kat Eye View of the World Tagged With: holiday, Italy, light, Monza, photoshop

Next Page »
  • Email
  • Facebook
  • Instagram
  • RSS
  • Twitter

Upcoming Events

Books Available

  Digital Photography for Beginners eBook Kat Sloma

Annual Postcard Swap

Online Photography Resources

search

Archives

Filter

  • Email
  • Facebook
  • Instagram
  • RSS
  • Twitter

Upcoming Events

© Copyright 2017 Kat Eye Studio LLC