Kat Eye Studio

  • Home
  • Portfolio
  • Books
    • Art with an iPhone
    • Digital Photography for Beginners
  • Workshops
    • Mobile Photography Workshop Series
    • iPhone Art Workshop
    • Out of the Box Composition Workshop
    • Photography & Creativity Talks
  • Free Resources
    • Mobile Tutorials
    • Exploring with a Camera
    • Liberate Your Art Postcard Swap
  • Blog
  • About
    • Artist Statement
    • Background & Experience
    • Contact

November 4, 2011 by Kat

Exploring with a Camera: Opposing Lines

Watch your Steps, Chicago, Illinois

Watch your Steps

Lately I’ve been noticing lines in my photographs. Not just any lines, but lines that run in opposition to each other. In Today’s Exploring with a Camera, we are going to explore Opposing Lines. You can join in the exploration over the next two weeks, by adding your images to the link tool at the end of this post.

Lines are a fantastic tool to move the viewer’s eye through a photograph. When there is a dominant line, the eye wants to follow it through. We can use this to great effect in our compositions, drawing the eye to a specific point or subject by setting up leading lines. I’ve touched on this topic before, in Exploring with a Camera: Linear Perspective.

What happens when there is more than one line? If the lines converge to a point, there is a flow to the photograph, leading the viewer’s eye to the convergence point. If the lines are in opposition, however, there is a dynamic tension that is set up in the image. Your eye moves from one place, only to move back in the other direction. This tension is fascinating to me, and is what I’ve been exploring with Opposing Lines in my photographs.


The dynamic of opposing lines in an image first caught my eye with this image, from Old Colorado City, Colorado. The perspective in the mural leads you in one direction, from left to right in the photograph. The direction of the bricks, however, leads you in the opposite direction: right to left. This dynamic of opposing lines was set up by the angle of the shot. If it had been straight on, the bricks would have been straight and would have served as a backdrop rather than a key element as an opposing line.

Frontier Town Mural, Old Colorado City, Colorado

Mural Lines

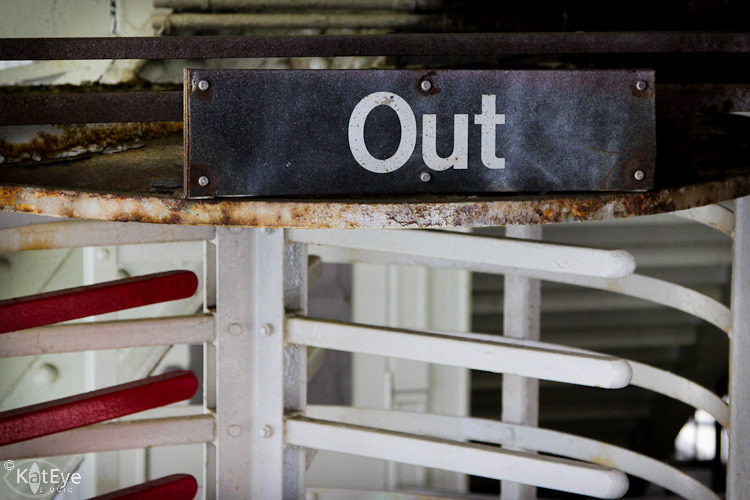
In the image below, the lines of the brick wall and the lines of the shadows from a nearby tree are in opposition. How does your eye move through this photo? The perspective, again created by standing at an angle to the brick wall, creates the opposing lines. The lines make an otherwise simple image more interesting. The lead-in image, of the stairway and shadow, provides a similar dynamic of opposing lines using shadows.

Lines of Brick and Shadow, Corvallis, Oregon

Lines of Brick and Shadow

I loved the lines created by the architecture in Chicago, and this image of reflected buildings sets up an interesting opposing-line dynamic. Without the reflection, the image would be a simple repeating grid of windows. With the reflection, there is a strong diagonal created by the buildings along the lines of the side of the windows. That diagonal is opposed by the thicker lines of the bottom of the windows. I find the opposing lines in the image more interesting than a standard view of buildings against sky.

Reflecting Chicago, Chicago, Illinois

Reflecting Chicago

Opposing lines aren’t just found on the outside of buildings, in this image from the Art Institute of Chicago, the reflection of the beam creates an opposing line. There is not as much tension in this image as those discussed previously, since the reflection serves to connect the two beams into a zig-zag. This leads your eye through from beam to beam. The opposing lines of the window panes makes a stronger dynamic, leading your eye back up to the top of the image after you zig-zag down.

Down and Up Again, Chicago, Illinois

Down and Up Again


Shadows, reflections and angled perspectives are all great ways to create opposing lines in your images. What other ways can you find to set up this dynamic? Take a look at your archives and go out exploring to find opposing lines. You can link up below, through 17 November. I can’t wait to see what you find!


FYI - Links will be moderated. Please use a permalink, ensure that your linked image is on topic, and include a link back to this site in your post through the Exploring with a Camera button (available here) or a text link. Thanks!

Filed Under: Exploring with a Camera, The Kat Eye View of the World Tagged With: architecture, black and white, Chicago, Colorado, Corvallis, Illinois, lines, opposing lines, Oregon, reflection, shadow

November 2, 2011 by Kat

Back to Balance

Under the Bridge, Chicago, Illinois

Under the Bridge, Chicago, Illinois

For the last half of October, I’ve been focusing on balance in my life. It’s been an interesting period, because for each idea I had about achieving and maintaining balance, there was an asterisk attached to it. It was as if there was a little footnote added in my brain:

*After the website is launched.

Now that the website has been launched, there is this gap in my time. You know that gap, the one that happens after a big project? Where suddenly you have time on your hands and no big overriding goal to fill it? That gap is a critical time. It sets the stage for what is to come. Do you fill it with lots of little things or one new big goal? Normally, I would fill it with one big new goal, or maybe lots of little goals, but for now it’s time to put my plans for balance into practice.

Those plans include planned time for my own creativity and fun. Time for the activities that give me energy. It’s too easy for me to let my project “to do” list take over, which drains my energy. If there are items on the “to do” list, I feel like I should do those first instead of the fun. Before I know it, these wonderful mornings I created by going part time are used up. I know I’m not alone in this kind of work ethic. It’s time for me to change up the dynamic, and I’ll do that by setting some rules about my time. Setting a schedule for creative fun and for the “to do” list. It’s not spontaneous or random, and, damn, if it isn’t uncomfortable! But, it will get me back to that creative play that is so important to maintaining the rest of my creative spiral.

Along with that, I’ll be working to avoid overcommitting, the bane of people with too many ideas. I realized that much of my lack of balance came from commitments I made, mostly to myself, way back into April and May. Yikes! Six months later… here I am recuperating. Can I commit a little less into the future, and leave space for new and interesting things to develop? You bet.

For me, November is going to be a month of focusing on my own creativity and what gives me energy. Photography, blogging, teaching my classes… all of these give me energy. They are part of my core creative processes, so they stay.  Learning gives me energy, so studying Lightroom is on the schedule. Painting is just plain fun, so I need to make time for it. Other than that, I look forward to going with the flow.

It’s time to get back to balance, and see what develops. Want to join me? What things can you do to get back to balance into your life?

PS – Visit me over at Mortal Muses today, musing on some fantastic light.

Filed Under: The Kat Eye View of the World Tagged With: balance, bridge, Chicago, Illinois, personal growth, Spiral of Creativity, stairs, time

October 28, 2011 by Kat

Bye, Bye Blogger

Exit of a Chicago el train station

Come Monday, The Kat Eye View of the World will have a new home! It’s time to move the blog and everything else located here to a new location, integrated into my new website: www.kateyestudio.com. Over the weekend I’ll be doing all of the final work to launch the new site and the blog in its new location on Monday. I’m so excited to share it with you all!!

If I do everything correctly with the changes and redirects, this should be fairly transparent to everyone. Not being a full-time web person however, there are likely to be a couple of bumps along the way. You can’t make a change as big as this one without going through some growing pains. I hope you’ll stick with me as I learn the ropes and settle in.

I thought I might be a bit sad, leaving this cozy little place on Blogger that I created over time. But since the words and images go with me, and the new site fits so much better (room to breathe!), the sadness hasn’t materialized. I just feel excitement and a smidge of nervousness for the transition, hoping it all goes ok.

Time to head out! See you on the other side.

Filed Under: The Kat Eye View of the World Tagged With: Chicago, Illinois, station

October 25, 2011 by Kat

Chicago & Me

Chicago & Me
We danced a little dance
of lines and curves.
Looking up, up up,
I forgot to look down,
and saw inside instead.
Saw that life
is play
and art
and travel
and friends.
Life is joy
in the moment,
seized.
A camera,
an orange umbrella
are all I need
to be happy.
City of lines and curves,
of light reflected back,
I see Me.
Forgive the random poetry, I’m reading a book of poetry right now and was inspired by the snippets of ideas strung together. These photos were taken at the Cloud Gate sculpture, aka “The Bean,” in Millenium park in Chicago. It was quite empty as I walked past on my way to the Art Institute, and I couldn’t resist a few self portraits with my orange umbrella. The moment just made me happy.

Filed Under: The Kat Eye View of the World Tagged With: Chicago, Illinois, orange, personal growth, reflection, sculpture, self-portrait

October 20, 2011 by Kat

Exploring with a Camera: Found Texture

Yay! It’s Exploring with a Camera day! After a week off exploring in Chicago I’m ready to explore with you all here on the blog. Today we’ll be diving into Found Texture in our images. At the end of the post you will find a link up to share your explorations of the topic over the next two weeks. There is a giveaway going along with this too! Keep reading to find out more.

It is no secret that I love texture in my images. I remember when I first started capturing images of texture for texture’s sake in Italy. I didn’t know what was going on, why I was drawn to capture images of peeling paint. It made no sense to me at the time! Now I know… it’s all about the texture.

In this exploration, we will be focusing on Found Texture, texture that is already existing and captured with your camera, not added texture in post-processing. Adding texture layers in post-processing is a popular and very fun way of changing your image, but that’s not the focus of this topic.

Let’s learn more about Found Texture…

What is Texture?

By my definition, a texture is found on the surface of a form. (Form is the representation of a three-dimensional object. If you’re not sure what I’m talking about, visit the past Exploring with a Camera: Finding Form post.) Here’s an example to help: Consider an object in the shape of a sphere. The sphere is the form, but the surface of the sphere may be smooth, like the tomato shown below, or rough, like the orange. If you are struggling with the concept of texture vs. form, think of this way: If you can imagine an object to have a different surface texture, but the underlying form of the object stays the same, you are distinguishing texture and form.

The surface holds the texture, and the texture gives an additional dimension to our photographs, making us want to reach out and touch. Even though we can’t physically touch the objects in an image, in our imagination we can. Texture adds a tactile nature to our experience of a photograph. We know what smooth feels like in real life, so the sensory experience of smooth is added to our experience of a photograph. The texture can draw us in as a participant in the image.

Texture is not only on the surface of forms in our images. Something large and flat serving as the background of the image, such as the wall in the lead-in photo, is also a surface that can have texture. In the case of the photo above, from Chicago, you see the texture of the brick.

How many types of texture are there? Let’s see if we can make a list… smooth, rough, gritty, sticky, crumbly, bumpy, velvety, leathery, prickly… add yours to the list in the comments below. We can capture all of this texture and heighten the sensory experience in our images.

Sources of Found Texture

When you start to notice it, texture is everywhere! Nature is a great source for random texture. Since my subjects tend to be in urban environments, I looked for natural texture while camping at the beach a couple of weeks ago. I found everything from the glass-smooth texture of the receding waves, to the rough-yet-soft texture on the trunk of a tree.

Humans have learned from nature, and covered our man-made world with texture. Some of it is purposeful and functional, to hide flaws in a wall joint or increase traction in a floor. Some of the texture comes as part of the process, such as in bricks. Some of the man-made texture in our world is purely for artistic beauty. The texture in the floor tiles below was created to be both artistic and functional.
The one thing I’ve noticed, however, is that man-made texture doesn’t have the same randomness as nature. Humans like patterns and processes, and our created textures usually have some sort of repeating pattern. Sometimes it is obvious, as in the floor image above, and sometimes not so obvious. Consider the texture that may be applied to a wall, there is a limit to the size and depth of the bumps you find. There is some randomness within the texture, but the overall texture is controlled.
When you add nature, in the form of time and weather, acting on the mad-made texture you get more natural randomness. I think that’s why I, along with so many other photographers, like to photograph “urban decay.” The added elements of time, weather and neglect increase the random texture in the images of everyday objects. It adds dimension and interest.
Capturing Texture

Now that you’re seeing texture everywhere, what is the best way to capture it? As in capturing form, texture will appear differently in different light. Bright sunlight will create stronger shadows and light/dark highlight of texture, while shady or diffused light will create more subtle highlights of the texture. This wall below, found in Chicago, is an interesting study of light and texture since it’s both in sun and shade. You can see how the sunlight enhances the texture.
You can see a similar effect in this image from Greece as well, as part of the wall is in sun and part is in shade. There are multiple textures in this image from more than just the light, however, with the texture of the wall, rope and door adding to the tactile nature of the image.

Along with light, color has a great impact on how we perceive texture in an image. Texture can be enhanced or overwhelmed by color. Color is useful to highlight texture when the light is non-directional or the texture is very subtle compared to the overall subject being photographed. In the case of the staircase in Portugal, the light is very diffuse so the texture of the wall is communicated by the color gradation. You can still “see” the texture, through the color variations.

Color can also dominate to the point that texture recedes in terms of visual information. Consider the image of the oranges shown earlier in this post. What do you notice first? Likely, the complementary color is the first thing you notice. The texture of the oranges, basket, vase and table are noticed second. To highlight or study texture, working with monochromatic images can help. The image of the driftwood below, converted to black and white, further enhances the texture of the splintery wood. The range of tones from light to dark are what provide the texture information, since the light is fairly even.

The image below from Burano has color, but it still monochromatic. This allows the form and texture in the image to be the subject. While diffuse, the light is still directional and highlights the texture and form.

Using Texture in Images

Now that you are thinking of what texture is, where to find it and how to capture it, let’s look at a few different ways of using texture in images.  One way of using texture is to capture it as the subject. This wall in Bologna was so interesting, I captured it just for the texture. Layers upon layers of different textures are visible.

The same with this wall in Greece, texture is the main subject. In both cases, I’ve included an architectural element to help ground the image in reality, but that is not necessary if you are capturing texture for texture’s sake. Textures create great abstract images.

Often, I find that I use texture as the “backdrop” in the image. The lead-in photo is one example. In the case of this scene in Burano, the texture of the wall is a backdrop for the scene with the chair and pot.
This textured wall in Torcello is the backdrop against which the tree, window and architectural fragment are arranged. The wall is not the subject, but the texture enhances the interest in the image and ties the elements together.

Creating contrast with texture is a great way to increase the interest in a photo. In the image below of the sea weed at the beach, the gritty sand contrasts with the smooth, rubbery surface of the sea weed.

The worn walls and steps contrast with the smooth, round pots, both in color and texture, in the image below from Varenna. The color and texture contrast, along with the lines of the steps, draw your eye directly to the pots of pretty flowers.
Summary

It’s time to start exploring Found Texture on your own! Here’s a quick review of the topics covered:
  • What: Texture is found on the surface of form, and gives a tactile dimension to images.
  • Sources: Nature, man-made and aged-man-made objects and surfaces are all possible sources of texture.
  • How: Light along with color (presence or absence) and tone can be used to convey the texture.
  • Ways to use: Texture can be the subject, a backdrop or used for contrast in an image.
There is so much more to texture, I look forward to learning from you as you share your images! You can link in below, the link up will be open through 3-November. As an added bonus, I am giving away a set of my “Texture” postcards! When you link in your texture image, you will be entered in the drawing to win.


FYI – Links will be moderated. Please use a permalink, ensure that your linked image is on topic, and include a link back to this site in your post through the Exploring with a Camera button (available here) or a text link. Thanks!


Filed Under: Exploring with a Camera, The Kat Eye View of the World Tagged With: Chicago, coast, Fira, found texture, Greece, Illinois, Oregon, texture

October 19, 2011 by Kat

A Morning at the Museum

Art on a rainy morning, what could be better? While in Chicago, I had a morning free to visit the Art Institute of Chicago. A wonderful place! The first major art museum I’ve visited since returning back to the US. I enjoyed the opportunity to see some new works of some of the painters I came to appreciate while in Europe, and learn more about American artists as well. The museum allows photos too – a very happy day for me!! My experience of art is always deepened if I can capture it with my camera.

Since I had limited time and I know what periods of art I like, I focused my visit on specific areas. American Modern Art (1900-1950), European Modern Art (1900-1950), and Contemporary Art (1945-1960). I also popped through Contemporary Art (1960 and later), Architecture and Design (special exhibit on Bertrand Goldberg), and Photography (although they were resetting the photography exhibit and most of it wasn’t open – sad!).

As always, I was drawn to abstracts with bright colors. Paintings that highlight gradations and transitions between color in unusual ways attract me. A new find this trip was German painter Franz Marc, I loved this painting called The Bewitched Mill. Very much like my favorite Italian Futurists of a similar time. I am always drawn to the art of 1900-1920 or so.

I just loved his use of color! Isn’t it gorgeous?

It was also fabulous to see more of Georgia O’Keefe’s work in the American section, she has a style that has always appealed to me. I was pleasantly surprised by how large the museum’s Impressionist collection was! It was great to see more of Monet’s water lilies, and Cezanne’s still lifes, among many others. I also very much enjoyed seeing these two paintings by Mary Cassatt. I’ve seen them before in texts but they are beautiful in person. She had such an amazing way of portraying everyday moments.
I left the museum refreshed and inspired. There is something about art, specifically painting, that just speaks to my soul. What a wonderful opportunity to connect with this again!

Emily, this last one is just for you. (Bueller… ? Bueller… ?)

PS – Lightroom 3 Update: I edited all of these in Lightroom this morning! I’ve had absolutely no instruction (books are on their way!) but I’m finding it intuitive to use and in some ways much simpler than Photoshop Elements. I will keep you posted as I progress!

Filed Under: The Kat Eye View of the World Tagged With: art, Chicago, Illinois, museum, painting

« Previous Page
Next Page »
  • Email
  • Facebook
  • Instagram
  • RSS
  • Twitter

Upcoming Events

Books Available

  Digital Photography for Beginners eBook Kat Sloma

Annual Postcard Swap

Online Photography Resources

search

Archives

Filter

  • Email
  • Facebook
  • Instagram
  • RSS
  • Twitter

Upcoming Events

© Copyright 2017 Kat Eye Studio LLC