Kat Eye Studio

  • Home
  • Portfolio
  • Books
    • Art with an iPhone
    • Digital Photography for Beginners
  • Workshops
    • Mobile Photography Workshop Series
    • iPhone Art Workshop
    • Out of the Box Composition Workshop
    • Photography & Creativity Talks
  • Free Resources
    • Mobile Tutorials
    • Exploring with a Camera
    • Liberate Your Art Postcard Swap
  • Blog
  • About
    • Artist Statement
    • Background & Experience
    • Contact

November 9, 2012 by Kat

Exploring with a Camera: Chiaroscuro

Greetings! Welcome to November’s Exploring with a Camera. This month I am going back to Italy, literally and figuratively, as we study chiaroscuro, or light/dark contrast. I found myself creating of images with strong light/dark contrast on my recent trip to England, reminding me that I used this technique on a regular basis when I was living in Italy. Images like this can create a strong mood and story.

Chiaroscuro is an Italian word, combining the words for light (chiaro) and dark (scuro), and it refers to an artistic technique of using light and dark to render an object as three dimensional in two dimensional art. It is commonly used to refer to very strong light and dark contrasts in a piece of art, such as seen in the works of Caravaggio and Rembrandt. If you aren’t familiar with their paintings, give the links a quick click to see some examples.

In photography, the concept of chiaroscuro can be used to create dramatic images. Creating an image with strong light/dark contrast has some challenges, however. Let’s take a look at how to overcome them so we can use this wonderfully dramatic artistic effect.


Contrast and your Camera

The built in light meters in our digital cameras are a fantastic tool, but they can’t read our artistic intent. The camera’s automatic settings are programmed to work with the light meter to get an even exposure across the frame. It reads the light and dark and recommends an exposure to get an average, based on mid-tone grey. This works great when we have even lighting and want the entire frame illuminated, but when we have a situation with a strong light/dark contrast, the automated exposure can be dramatically wrong. If there is a small amount of light compared to dark areas within the frame, to get the average exposure camera will try to make the darks lighter, and will overexpose. If there is a small amount of dark in light, the camera will try to make the lights darker, and will underexpose.

For an effective chiaroscuro image, you need to expose for where you want the detail. To do that, you will need to compensate your exposure manually, increasing or decreasing the exposure to get the desired effect. You can use manual mode or exposure compensation in the creative modes to adjust the exposure. Look up exposure compensation and exposure modes in your camera manual to learn more. (If you’re not clear on this, my Digital Photography Basics ebook will be ready very soon and it has a more thorough explanation. Sign up for the Kat Eye News to be notified when it’s available.)

For the typical chiaroscuro effect, a small amount of light in dark, you will want to underexposure. This will keep the dark tones very dark, almost black, while the light tones will not be overexposed. Play around with your exposure, however, to see what works best for the specific image you want to create.

If your light source is actually in your frame, don’t worry if your highlights are overexposed. In the example below, underexposing further would render the view out the window visible, but would have put the figure in silhouette — not the desired effect. With chiaroscuro, you want to see the form of the subject.

You can also adjust your highlights and shadows in post processing to create greater light/dark contrast. In this image, I pushed the shadows darker to create more contrast between the figure and the alley.


Finding the Light

It takes the right lighting situation to create a chiaroscuro effect. You need the contrast of light in dark, which requires a light source that drops off fairly quickly into darkness. An interior room with one window, an alley opening into sun, or a light at night all provide the opportunity for creating with light/dark contrast.

There is no specific direction the light needs to be relative to the camera. In my examples, I get chiaroscuro effects with backlight, side light, and top light.

Interior hallway with back light from outdoor access

Inside house with side light from north facing window

Interior with top light from lamp.


Focal Point

When you have a strong light/dark contrast, it will become the focal point of your image, whether you intend it or not. Going back the concept of visual weight, strong light/dark contrast has a strong pull on the viewer’s eye. If your intended focal point is not the part of the image with the strongest contrast, there will be competition between the two. I’ve found that creating the focal point in the point with highest contrast is effective.

In this image below, the focal point is the door at the end of the alley. The backlighting makes the door the highest contrast element in the image. In addition, all lines lead to this door, and the door is in focus. All of these give the door visual weight, pulling the eye right to it.

Now consider a similar image, with the wall in focus instead of the door. Does it work as well?

I don’t think so. The strong light/dark contrast still pulls my eye but since it’s not in focus, my eye has to wander around the image trying to find the intended focal point.

Let’s also consider the effects of color in the image. Bright color can be as strong as light/dark contrast when considering visual weight. You will notice that many of my chiaroscuro images are in black and white. Color can, at times, be a detractor from the intended focal point. Consider the alley image again, this time in color. Does it work as well as the black and white?

In my opinion, no. The green of the leaves and wall attract my eye and detract from the door. The image is not as strong in color.


Practice makes Perfect

Creating effective chiaroscuro images takes practice and experimentation. To play with this technique:

  • Find a place with a point light source, like a lamp or a window in an otherwise dark room.
  • Grab a volunteer to model for you or set up a small still life.
  • Take multiple images from different angles and at different exposures, and also try varying your intended focal point.
  • Review the images and see what works out of the camera and with post processing.

Have fun! I look forward to seeing your exploration of chiaroscuro images. You can link in and share through the end of the month!


Filed Under: Exploring with a Camera, The Kat Eye View of the World Tagged With: black and white, chiaroscuro, contrast, Exploring with a Camera

May 5, 2011 by Kat

Exploring with a Camera: Visual Contrast

One of the best tools a photographer has to create a powerful photograph is contrast. Today in Exploring with a Camera, I’m going to talk about the concept Visual Contrast and how it can help you create interesting images. At the end of the post, there is a link tool for you to link in your images on the theme, either new or archive. I hope you’ll join in!

For this exploration, I’m going to define Visual Contrast as the inclusion of contrast in the elements of a photograph that leads to a higher impact. The first thing that comes to mind for me when I think “contrast” and “photograph” together is contrast in light/dark. Here’s an example:

In our study of light and exposure as photographers, this is an obvious kind of contrast. Our camera, which has a limited dynamic range (range between light and dark) compared to our eyes, almost creates this type of contrast for us. For this theme, let’s look beyond light/dark contrast into other types of contrast that are more subtle but just as powerful for creating images.

The idea for this theme comes from Michael Freeman’s The Photographer’s Eye. In this book, he refers to a list of contrasts created by Johannes Itten, a Swiss painter and teacher at the Bauhaus school in the early 1900’s. Itten developed some revolutionary ways of looking at basic artistic concepts as part of his “preliminary course” on art. Using contrasts to create interesting compositions was one of his ideas. While these contrasts were original intended for painters and other fine arts of that time, they work just as well for photographers today.

Here is the list of contrasts that Freeman shares in his book and also in this post if you would like to read a bit more:
point / line
area / line
area / body
line / body
plane / volume
large / small
high / low
smooth / rough
long / short
hard / soft
broad / narrow
still / moving
thick / thin
light / heavy
light / dark
transparent / opaque
black / white
continuous / intermittent
much / little
liquid / solid
straight / curved
sweet / sour
pointed / blunt
strong / weak
horizontal / vertical
loud / soft
diagonal / circular
delicate / brash (added from Freeman’s examples in the book)

After playing with this concept, I also added a few of my own:
old / new or young
bright / neutral
natural / man-made
What other contrasts can you think of? Leave a note in the comments if you have something to add to the list. I’ll be sending a printable download of the list in my next newsletter this weekend, and will add any contrasts that you come up with here too. You’ll be able to tuck this list into your bag and keep it with you for inspiration on the go. (If you aren’t signed up for the newsletter yet, you can find the sign up form on the blog sidebar.)

Now that you have the list, let’s look at some examples of contrast in my photographs…

Large / Small

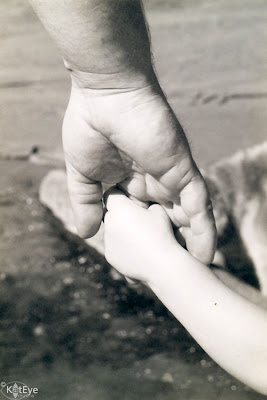
This photo is one of my favorites of my son’s early years. It’s one of the few prints from my film days I actually have here in Italy, and I was happy I had it available to share with you for this theme.  I love the large/small contrast between the hands of my husband and son. There is also a parallel old/young contrast in this image.

Old / New

Our travels around Europe have provided us with plenty of examples of contrast between old and new. This image of a Roman theater at the foot of the Acropolis in Athens is an especially clear example of old/new. Millenia old ruins against the backdrop of a large, modern city. Quite a contrast.

Natural / Man-Made

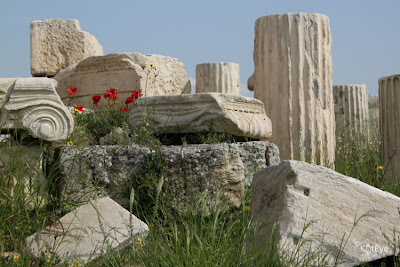
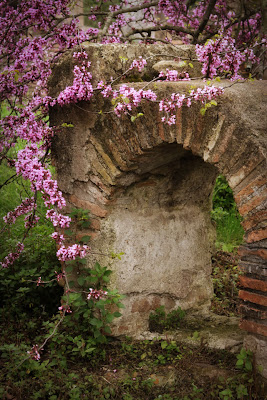
Along with old/new, visits to ruins can give a great contrast between natural and man-made. I love showing decaying ruins along with thriving nature. It makes quite a commentary on the permanence of what we create in the larger scheme, doesn’t it? The opening photograph of the poppies and the Greek ruins at the Acropolis, and this image of a blooming tree by the Roman ruins of Ostia Antica near Rome are good examples.

Hard / Soft

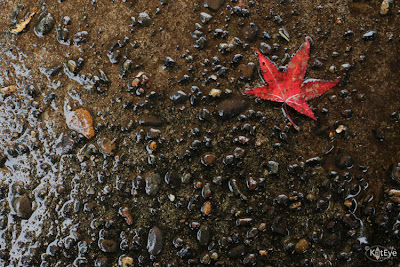
The hard, rocky pavement contrasts dramatically with the soft leaf in this image. The image also includes the contrasts of  many/few and bright/neutral color. 

Bright / Neutral

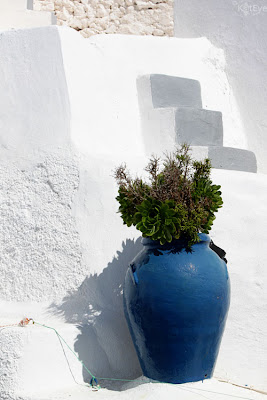
Just being back from Greece, you didn’t think I could go a day without showing some white and blue, did you? The bright blue pot against the neutral white background is a strong contrast of color. The popular technique of a black and white image with selective color showing takes advantage of this type of color contrast. This image also includes contrasts in smooth and rough textures.

Curved / Straight

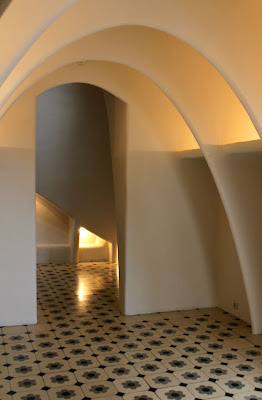
The straight, geometric lines of the floor contrast with the gentle curves in the walls in this image from Barcelona. The contrast is further enhanced by the softer, underfined edges on the curves versus the very hard and defined edges of the lines in the floor.
Smooth / Rough

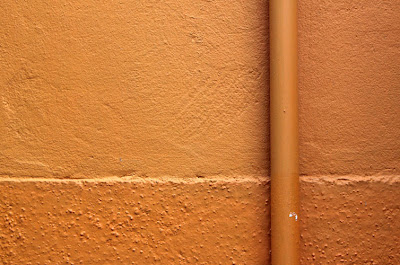
The variation in textures is the main contrast in this photograph from Burano. The contrast created by light/dark also helps define the edges and separate the different textures.

That’s enough examples to get you started! I’ll share more over the next couple of weeks as we explore this topic. I was actually surprised at home many I came up with, once I started looking. 

Now it’s your turn. Take a look through your archive or go out with your camera this next week or two and look for Visual Contrast. Then, come back and link in the images you found in this post and/or add them to the Flickr pool. How many contrasts do you think we can find as a group? I can’t wait to see!
Don’t forget to comment on this post, if you have ideas for other contrasts to include in the list. If you haven’t already, sign up for the newsletter and you’ll get a printable list of Visual Contrasts in your email this Sunday. 

Filed Under: Exploring with a Camera, The Kat Eye View of the World Tagged With: Athens, color, contrast, Greece, Ia, Santorini, texture, visual contrast

April 19, 2011 by Kat

Seeking Beauty, Finding Contrast

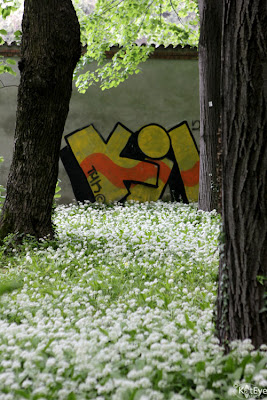
As I was photographing the flowers under the trees last weekend, I started to notice the graffiti on the park wall. My goal became to adequately capture the contrast in the scene, between the natural beauty and the man-made creativity. This is very nicely executed, artistic graffiti, but it doesn’t belong in this setting. That makes it all the more interesting to me.

I also couldn’t help notice the irony of the signature and the copyright symbol. Here we have an artist seeking legal protection for an illegal act. Another contrast, layered within, that made me think. Do you think artistic protection of an illegal form of art would hold up in a court of law? An interesting conversation, for sure.

I found this after the “waiting to click” shot I envisioned, of a bicyclist riding the path through the flowers, just didn’t work out. There were no bicyclists coming by at the time I was in the park. Actually, there were a couple of men who rode by on mountain bikes, but I was looking for a dressed-up Italian woman on a city bike. Never happened. I gave up on waiting to click and went seeking something else to shoot, when I found this image.

Has your “waiting to click” shot worked out? It’s not too late to link in to Exploring with a Camera: Waiting to Click. Today is the last day to link in, and tomorrow I’ll share some new images from the Flickr pool.

Remember: If you don’t find the shot you are waiting for, that’s ok too. I’m sure you’ll find something else interesting to photograph. As this image reminds me, I always do. 🙂

Filed Under: The Kat Eye View of the World Tagged With: contrast, flowers, graffiti, Italy, Parco di Monza, spring

April 20, 2010 by Kat

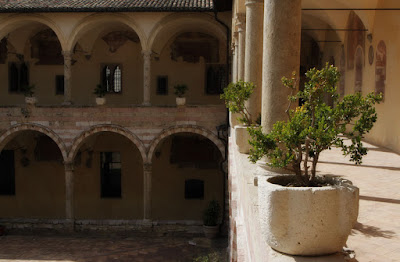
Contrast

Behind the Basilica di San Francesco (Basilica of St. Francis) in Assisi is this courtyard. I’m not sure if it’s a cloister or what exactly it is, but it’s a beautiful little place full of contrast. I like the contrast of lines and curves, sun and shade, near and far, bright color and subdued neutral. See how many contrasts you can find in this one image!

Filed Under: The Kat Eye View of the World Tagged With: arch, architecture, Assisi, Basilica di San Francesco, contrast, Italy

  • Email
  • Facebook
  • Instagram
  • RSS
  • Twitter

Upcoming Events

Books Available

  Digital Photography for Beginners eBook Kat Sloma

Annual Postcard Swap

Online Photography Resources

search

Archives

Filter

  • Email
  • Facebook
  • Instagram
  • RSS
  • Twitter

Upcoming Events

© Copyright 2017 Kat Eye Studio LLC