Kat Eye Studio

  • Home
  • Portfolio
  • Books
    • Art with an iPhone
    • Digital Photography for Beginners
  • Workshops
    • Mobile Photography Workshop Series
    • iPhone Art Workshop
    • Out of the Box Composition Workshop
    • Photography & Creativity Talks
  • Free Resources
    • Mobile Tutorials
    • Exploring with a Camera
    • Liberate Your Art Postcard Swap
  • Blog
  • About
    • Artist Statement
    • Background & Experience
    • Contact

Archives for April 2011

April 28, 2011 by Kat

Share Your View: Rimmed with Light

It’s been a week since I posted Exploring with a Camera: Rimmed with Light. Have you been seeing your subjects outlined this week? If so, share them here or in the Flickr pool, we’d all love to see!

I’m on vacation this week so today I’m not able to post images from the Flickr pool today, but I’ll share some of my favorites next week as we wrap up Rimmed with Light. Instead, today I’m sharing this spring image I captured on a morning walk in Parco di Monza. I loved how the trees were outlined by light coming from the left, defining each one. As I prepped for this topic, my morning walks recently became study time. Can you imagine me, stalking people in the park with my camera as I learned the angles and backgrounds it takes to capture rim light? Unfortunately, the people moved too quickly for me to capture images good enough to share, but they sure helped me learn! Keep my experience in mind if you are struggling with capturing rim light, sometimes just observing for a while can help you learn enough to eventually capture the image you are seeking.

I hope you are having a great week, I’ll be back here on Monday!

Filed Under: The Kat Eye View of the World Tagged With: Parco di Monza, rimmed with light, share your view

April 23, 2011 by Kat

Off to the Sea

I am off on holiday for the next week. It’s Easter Break for my son’s school and we are headed to Greece. Before we left Europe I wanted to photograph a place with white, white buildings and blue, blue sea, so we will be spending the week on the island of Santorini with a day or two in Athens.

To give you a taste of the sea, here is an image from the Cinque Terre, on the Ligurian coast of Italy. This region is more pink and green than white and blue, but beautiful nonetheless.

Even though I won’t be writing here this week, there is a lot going on that you can participate in:

  • There is a new Exploring with a Camera topic: Rimmed with Light. Stop over and see how to capture this beautiful type of light. You are welcome to link up or share your images in the Flickr pool.
  • I just “officially” announced the Liberate Your Art Postcard Swap yesterday and it’s open for sign up! Yay! I hope you’ll join in with sharing your artwork in the swap.
  • My first newsletter will arrive in your mailbox tomorrow! It will include a download of the Time to Blossom image I shared last weekend. If you haven’t signed up for the newsletter yet, you can at any time. Just look for the form on my blog sidebar.
  • The Mortal Muses theme right now is “Here Comes the Sun.” Share your images with “flare” with us here and you may be featured on the blog. I just mused on Signs of Spring on Thursday, come by and see the signs of spring blossoming on our blog.
I hope you have a great week! 

Filed Under: The Kat Eye View of the World Tagged With: Amalfi Coast, Cinque Terre, flowers, Italy, sea, yellow

April 22, 2011 by Kat

Join me in the Liberate Your Art Postcard Swap


What happens when you create your art? Does it make you happy? Do you find that you have an amazing boost of energy, of insight into life and self? Do you find that you feel centered and grounded, as if some piece of you has been completed for brief moment? I’ve discovered the act of creating, of making art of any kind, can have an amazing and transforming effect on me personally. I know I’m not alone.

Now, what happens when you share that art with world? You share a little bit of yourself, and add a little bit of beauty or joy or brightness into someone else’s day. When you share your art, that wonderful energy you gained in the act of creation is not gone, it is magnified. You will see it reflected back to you in different, positive ways.

That’s what the Liberate Your Art postcard swap is all about – sharing your art, liberating it out in the world, where it can do its greatest good. I’m so excited to officially launch this today and get the information to you, so you can get started on making your postcards! At the bottom of this post you can find a the sign up form to receive more details via email and a button to share on your site.

Here’s an overview of the Liberate Your Art Postcard Swap:

WHO: Artists in any medium. Photography, painting, poetry, typography, jewelry, sculpture, knitting, cooking, illustration – you name it. If you can have an image of your art printed on a postcard, you are in! If you want to share a blog or website address, I’ll have a list of participants posted on the Liberate Your Art page so you can find each other.

WHAT: You will send 5 printed postcards of your original art to me, along with your address and return postage. I will then swap them around and you’ll receive 5 postcards from different artists mailed back to you over a period of a few weeks. (The email you receive once you sign up will have all of the details on what to do.)

WHERE: You don’t have to go anywhere, and participants from all over the world are welcome! You will send your postcards to me in the US (I’ll be moved back by then) and I’ll mail them back out from there. Details for international participants will be included in the email.

WHEN: The postcards will need to arrive at my US address between July 5 and July 15.

WHY: To liberate your art into the world, where it can do the most good!

I’ve set a personal, crazy-big goal for this swap – I would love to have 200 participants from all over the world. Can you imagine, 1000 postcards of wonderful art, winging their way around the world? I can! But I need your help. Please share about this swap on your blog, facebook page, tweet it and get your friends to sign up too. If we reach this goal, I am going to do something crazy too – send a personal post card to each and every person who participates. I get excited (and a little scared) just thinking about it!

The sign up form is below and can also be found on the Liberate Your Art page. Once you sign up, you will need to confirm your subscription to the list and you will receive the email with more details.

**sign up form removed, July 2011 swap closed**


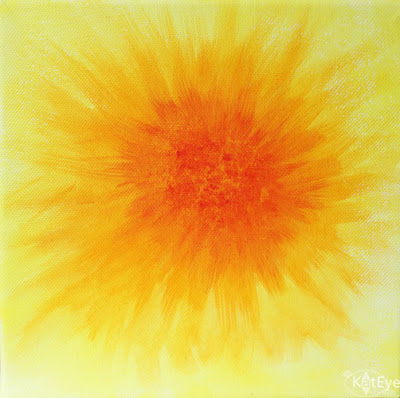
Today I’m also linking up the painting I did for the blog button to Kristin and Eva‘s Paint Party Friday. I started painting in acrylics shortly after moving here to Italy, but my passion for photography has taken over and I haven’t painted in a while. Recently I emailed Kristin to ask her a question about one of her painting techniques and I shared a few of my paintings with her too. Since then, she’s been encouraging me to paint again so I wanted to share this with her to say, “See Kristin! I listened to you!” Thanks so much for the encouragement, Kristin. I’m sure there will be more paintings to come.

Filed Under: Liberate Your Art Postcard Swap, The Kat Eye View of the World Tagged With: liberate your art, my painting, postcard, swap

April 21, 2011 by Kat

Exploring with a Camera: Rimmed with Light

Earlier this year, as I visited art museums in Madrid, I found myself drawn to paintings with two features: Interesting skies and rim light. When that happens, it’s usually only a matter of time before these elements start showing up in my photography. We’ve already covered the sky as an Exploring with a Camera topic in Capture the Sky, so today we’re going to complete my Madrid fascination and talk about subjects Rimmed with Light.

If a subject is rimmed with light, you get an effect of glowing edges of light outlining your subject. Rim lighting is a form of backlighting, but with the light source off to the side. In my recent study I’ve found it takes some specific conditions to capture rim light:

  1. Directional light. If there is even light, you won’t have the strong light/dark contrast needed for rim light. You need directional light in order to get a strong contrast in light and shadow. The directional light doesn’t have to be direct sunlight, it can be a lamp or a window in an otherwise unlit room. 
  2. Angle of light source, subject and camera is important. To get rim light, the light source should be behind the subject but off at an angle. Low light works best, such as the sun in morning and evening, but is not always required. If the light is directly behind the subject, you will get a silhouette. If the light source is behind and only slightly off to the side of the subject, you can get rim light but you are at risk of lens flare (which you may or may not want). If the light is completely to the side of the subject, you get sidelight and will not have the “rim” effect. 
  3. Contrasting Background. What’s behind your subject matters, you need some contrast to really get the rim light to show brilliantly. The darker the background, the better the rim light will show up. A background in shadow works very well, as does converting images to black and white to highlight the get the tonal values and avoid color distractions.
  4. Exposure. The exposure you choose will effect how the rim light shows up and can significantly change the focal point of the image. For dramatic contrast with focus on the rim light, expose for the rim light with subject underexposed. To bring out more detail in the subject, overexpose the rim light.  
I created this small diagram to clarify the requirements visually. The angle of light/subject/camera in this diagram is not scientifically determined (just to warn any of you engineers out there) it’s just to give an idea to help you visualize the scenario that gives you rim light. This is a top view: 
But, a picture is worth a thousand words, right? Let’s look at some images…
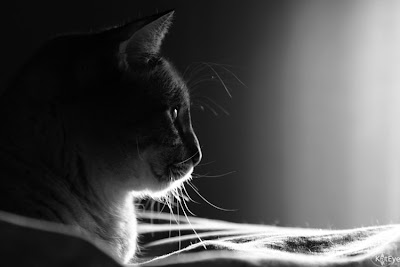
This image of Stevie, my cat, is exposed to show the details highlighted by the rim light. I had all of the elements I needed to capture an image rimmed with light: sunlight coming through a window on the right, and a background in shadow. I put myself on the same level as the subject, and moved around left to right to experiment with the background that would give the best contrast while not losing the rim light. You can see how the light coming in the window curtains behind dramatically drops off and creates a dark background to contrast with the rim light. Converting this image to black and white helps keep the focus on the light and dark contrast and not the brightly colored blanket under Stevie.
This was one time that Stevie actually cooperated and sat still long enough for me to capture multiple images and study the lighting situation. Below are a couple of images straight out of the camera to show you the effect of exposure. In the first image, the exposure is set for the rim light, and Stevie’s face is very underexposed. There is not enough rim light to highlight the full outline of his head, and he gets lost in the background.
1/64, f/4, 80mm, ISO400
In this next image, the exposure is set to get more detail in Stevie’s face. I like this one with the detail better but the color of the blanket reflecting in his face is distracting to me. In my editing I would convert this to black and white to resolve that problem.

1/15, f/4, 80mm, ISO400
In studying rim light, it is good to move yourself around relative to the subject in order to see when the rim light appears/disappears and how it contrasts with the background. It is hard to do this type of study with moving subjects, so I’ve found statues can be a great way to learn. 
I loved how the sculpture below, in the garden of the Rodin museum in Paris, is outlined with light. The hedge and trees behind created a good contrasting background that allows the rim light to stand out. It helps that the subject is a dark color, to further create contrast with the rim light. In this image, there is not only rim light created by the sunlight on the right, there is also sidelight in the reflected light coming from the pavement on the left. This light is more diffuse and serves to highlight the details in the statue subtly, without competing with the outline created by the rim light. 
Another Rodin sculpture, the image below is indoors at the same museum. This was shot by looking toward a corner of a room. There is a window on the right wall, facing the direction of sunlight, and a window on the left wall, in the shade. Even though the sun is not shining directly on this statue through the window, you can see the effect of the directional light in creating rim light on the right, while the light is more diffused from the left and highlights more detail. The background is not dark, but there enough contrast for the rim light. Converting to black and white helped remove some color distraction of the background wall paneling. 
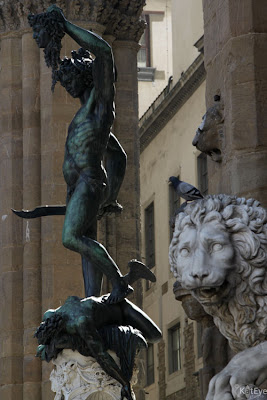
One final sculpture image shows that the light does not always need to be low in the sky, it just needs to be directional and at an angle. For the image below, it was near noon and the sun was high in the sky, but since the buildings blocked most of the direct light, only one shaft fell on the statue in the Loggia in Florence and created the rim light.  
Shafts of sunlight are great for creating rim light. This self portrait I captured in Venice is a good example of how a shaft of light can be used, along with the contrast of the other areas in shadow, to capture some rim light. 
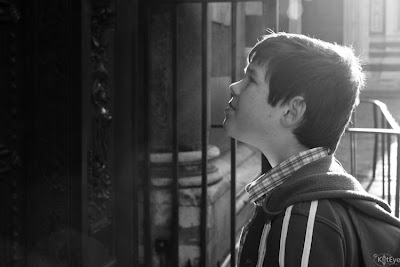
Hair, fur, etc. all seem to be great subjects for using rim light, since so many individual details can be highlighted by the light. They can also be difficult to capture, since subjects with hair and fur are usually in motion! This image of my son is from early in the morning in Florence looking at the Baptistry doors, next to the Duomo. I loved how the individual hairs on his head were outlined along with the features of his face.You might notice the flare, I was looking a bit more into the sun than was desired. Moving slightly to the right might have eliminated the flare, while still keeping the rim light. I will never know for sure though, because my son wasn’t interested in keeping still that long for me to study him in this light. Again, I converted this image to black and white to highlight the light/dark tones and avoid color distractions from my son’s clothing.

Having all of the elements required to capture rim light can be challenging, especially with moving subjects.  It is completely worth the challenges, however, when you see the end result of a subject beautifully outlined with light. I’m still on my quest for images with rim light, and now that I’ve learned a bit more about how to capture them it will be easier to see when the conditions are right.

How about you? Have you been able to capture subjects rimmed with light? Look through your archive or go out seeking the rim light, and share your images here with us. You can link in below or add your images to the Flickr pool, or both. If you have any other tips for capturing subjects outlined in light, share those too! I look forward to learning from you.

Filed Under: Exploring with a Camera, The Kat Eye View of the World Tagged With: Florence, France, home, Italy, Paris, rimmed with light, sculpture

April 20, 2011 by Kat

The Wait is Over

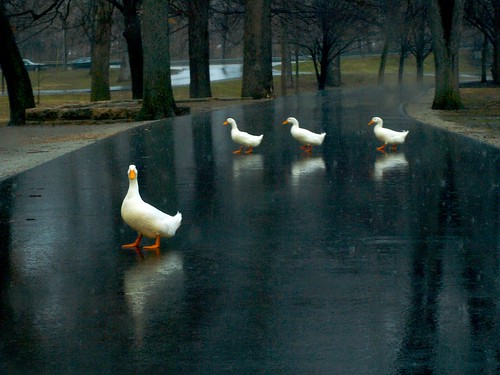
The Crossing Guard
The Crossing Guard by tim mcmurdo

Well, our Waiting to Click is over for now. How did it go? I enjoyed seeing all of the images in the link up and the Flickr pool, thanks for your participation. You were waiting on everything from animals to people to water to the sun!  This is not the easiest concept to come up with a picture on demand, so I hope if weren’t able to capture something now you’ll be aware of the movement and change in our world  and see more photographic opportunities in the future.

Tomorrow will be a new Exporing with a Camera post, and we’ll be exploring how to get our subjects Rimmed with Light. See you then!

Where you go, I shall follow  . . .

Where you go, I shall follow  . . . by Bella ❤

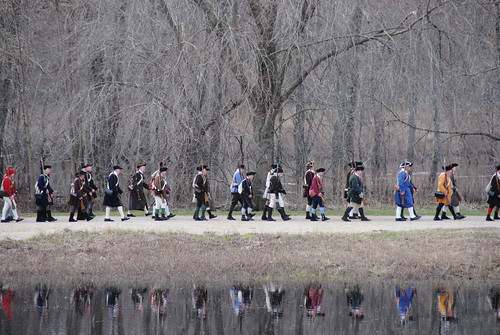
Colonists marching
Colonists marching by Phyl H

Filed Under: The Kat Eye View of the World Tagged With: share your view, waiting to click

April 19, 2011 by Kat

Seeking Beauty, Finding Contrast

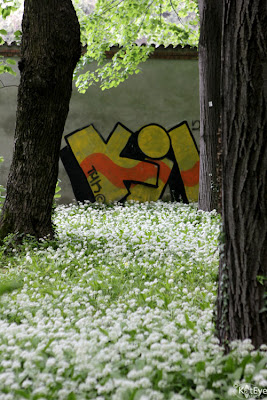
As I was photographing the flowers under the trees last weekend, I started to notice the graffiti on the park wall. My goal became to adequately capture the contrast in the scene, between the natural beauty and the man-made creativity. This is very nicely executed, artistic graffiti, but it doesn’t belong in this setting. That makes it all the more interesting to me.

I also couldn’t help notice the irony of the signature and the copyright symbol. Here we have an artist seeking legal protection for an illegal act. Another contrast, layered within, that made me think. Do you think artistic protection of an illegal form of art would hold up in a court of law? An interesting conversation, for sure.

I found this after the “waiting to click” shot I envisioned, of a bicyclist riding the path through the flowers, just didn’t work out. There were no bicyclists coming by at the time I was in the park. Actually, there were a couple of men who rode by on mountain bikes, but I was looking for a dressed-up Italian woman on a city bike. Never happened. I gave up on waiting to click and went seeking something else to shoot, when I found this image.

Has your “waiting to click” shot worked out? It’s not too late to link in to Exploring with a Camera: Waiting to Click. Today is the last day to link in, and tomorrow I’ll share some new images from the Flickr pool.

Remember: If you don’t find the shot you are waiting for, that’s ok too. I’m sure you’ll find something else interesting to photograph. As this image reminds me, I always do. 🙂

Filed Under: The Kat Eye View of the World Tagged With: contrast, flowers, graffiti, Italy, Parco di Monza, spring

Next Page »
  • Email
  • Facebook
  • Instagram
  • RSS
  • Twitter

Upcoming Events

Books Available

  Digital Photography for Beginners eBook Kat Sloma

Annual Postcard Swap

Online Photography Resources

search

Archives

Filter

  • Email
  • Facebook
  • Instagram
  • RSS
  • Twitter

Upcoming Events

© Copyright 2017 Kat Eye Studio LLC