Kat Eye Studio

  • Home
  • Portfolio
  • Resources
    • Online
    • Books
    • Workshops
  • Blog
  • About
    • Artist Statement
    • Background & Experience
    • Contact

February 10, 2012 by Kat

Exploring with a Camera: Silhouettes

Welcome to February’s installment of Exploring with a Camera! In this exploration we’re going to be looking at Silhouettes — how to capture and effectively use them in your photographs.

Lately, if I have my camera in my hand, it’s because I’m seeking the silhouettes of the trees against the early morning or late evening sky. Perhaps it’s because we’ve had an unusually clear winter here in Oregon, or maybe it’s just what I’m noticing now, but the shapes of the trees against the sky have been fascinating me. Have you ever noticed how different each type of tree looks in silhouette?

Silhouettes are all about shape. You take all dimension, all form, out of an object when captured in silhouette. This can be challenging, since you have to learn to see the shapes, and how they merge together, in order to compose your photograph. You may not realize how much information your brain infers from the knowledge of a 3D form until you distill it down into the 2D shapes using silhouettes. Not only that, but exposure when capturing silhouettes is not always straightforward. This makes exploring silhouettes a great learning opportunity!


Elements of an Effective Silhouette

Chances are, you achieve silhouettes in your images all the time without even thinking about it. There are a few elements that you need to create an effective silhouette in an image:

  • A light source behind your foreground object(s) in silhouette. The light source can range from back light to almost being side light, but the more directly behind the object the light is, the more of a silhouette you will achieve. The light doesn’t have to be particularly strong or directional, as shown in this example of my husband and son peering into an aquarium window.

    Even in side light, you can at times achieve a strong silhouette but some of your object may be highlighted. (See Exploring with a Camera: Rimmed with Light for an exploration of side light.) In this example below, even though it is full daylight and the light is a bit to the side, my son is a silhouette against the sky.

  • You need strong contrast between your object in silhouette and background. The background needs background to be lighter than the object in silhouette. The more contrast, the more the silhouette shape will pop. In this example, the tree is strongly contrasted against the morning fog. Converting to black and white increases the contrast, making the detail of the tree branches clearly visible.
    Reflections of light off of surfaces, like water or pavement, can enhance the contrast. The silhouette of this boat in the Venetian lagoon is created using water as the backdrop.
  • You need a recognizable shape. Unless you are working to create an abstract image, you have to pay close attention to the shapes of the object in your foreground. Multiple elements will blend together to get one shape when seen in silhouette. Being able to recognize how the shapes blend with each other and interact with the background is an important part of achieving a silhouette. In this moment of connection captured, it was important to ensure the figures weren’t merged so much as to not be recognizable. The space between their feet and the shadow helps keep the shape identifiable.

    A complex shape can be made more recognizable by effectively using any openings. In the case of the image below, the openings make the shipwreck on the Oregon coast an effective and recognizable silhouette.


Exposing for a Silhouette

Exposing to achieve a silhouette can be tricky. In-camera meters seek to achieve an average “mid-tone grey” exposure across the frame. When you have strong contrast of dark and light, as in the case of a silhouette, the camera will often choose settings that overexpose – making the background too light and capturing detail in the silhouetted object you may not want.

Since you want the contrast of black silhouette (with no detail) on light background (with most of the detail), you will want to underexpose relative to the camera’s meter reading. Depending on your lighting situation, you may need to underexpose 1 to 2 stops. If you manually choose your settings, this is straightforward. If you use the automated settings on your camera, there are a couple of ways to underexpose:

  • Use Auto-Exposure (*AE) Lock. With this feature, you aim your camera so that the background fills the viewfinder, lock the exposure, then recompose your image with the silhouette where you want it. When you press the shutter the camera focuses and takes the picture, but the exposure was set when you locked it. The exposure resets each time you take the picture.
  • Use Exposure Compensation (+/-Av). With this feature, you choose how much you want to underexpose your image, such as -2/3 or -1 stop. When you press the shutter button, the camera focuses and meters the exposure, then compensates the settings to underexpose as you instructed. This setting remains each time you take the picture, until you change it.

Revisit your camera manual to get the details on how to use these settings for your camera.

Capturing a stained-glass window, such as this gorgeous one found in Heidelberg, Germany, is the kind of situation where you will struggle if you rely on the camera’s automated settings. The camera’s attempt to get an average mid-tone grey across the frame would result in the window being completely “blown out,” or overexposed, with no detail. By underexposing relative to the camera’s meter, exposing for the windows only, you allow the dark areas to be black and you capture the detail of the windows.

You can also adjust your image in post-processing to increase the silhouette effect. If I still have detail in the dark areas, I will darken the shadows in order to increase the overall contrast. I may also lighten the background, but that can in turn begin to reveal detail in the silhouette you don’t want. It’s a give and take, so play around in your post-processing to see what you can do to create silhouettes. In the image below, taken in Salzburg, Austria, I exposed to achieve a silhouette in the towers against the sky, but still had some visible detail in the foreground next to the river. In post-processing, I increased my contrast by darkening the shadows, which created a more uniform black silhouette throughout the image.


Using Silhouettes

Silhouettes can be used as the subject of an image, as in the case of many of the examples already shared, or to set off other elements by their contrast. For example, in this image from the Amalfi Coast of Italy, the silhouette grounds the image and provides contrast for the interesting light in the sky and on the water.

In this image from Venice, the silhouette of the Bell Tower serves as a backdrop, enhancing the sense of place fo the lamp. It’s a simple image, yet it screams “Venice” to me due to the inclusion of the silhouette in the background.


There is something appealing to me about the simplicity of distilling an object down to its shape. I find the emotional impact is greater by the simplification a silhouette provides. The image of the couple in embrace becomes “love” or my son with his hands thrown wide becomes “joy.” A silhouette turns an object into a graphic representation, cutting to the essence and imparting a different meaning than if the object were seen in full light.

I hope after reading this you have become as fascinated by silhouettes as I have been lately. Look through your archive, or go out exploring with your camera to find new silhouettes and come back here to share. This link up will remain open through 24 February. I can’t wait to see your silhouettes!


Filed Under: Exploring with a Camera, The Kat Eye View of the World Tagged With: Austria, Corvallis, exposure, Germany, heidelberg, Italy, Oregon, river, salzburg, silhouette, Sirmione, sky, tree, Venice, window

June 4, 2011 by Kat

Scotland is…

Dramatic skies
Church steeples
Green hillsides
Rain then sun then rain
Plaid and kilted
Friendly
Bagpipes
Bloody history
Lochs and firths
Castles
Lilting accents
Hearty food
Lots of fun

We are back from our relaxed week in Scotland, where the weather was amazingly warm and sunny the last couple of days. I even got a bit of sunburn! Back in Italy it’s grey and rainy, so my sunburn will fade fast. I can feel it disappearing already.

This image is from our first evening in Inverness, one of the times the sun popped out right before sundown. I loved the dramatic light and dark contrast found in the sky and the churches. Just one of the many skies we witnessed on this trip, it was ever changing. I’m just starting to go through my pictures and I look forward to sharing more this week!

Don’t forget, today is the last day to sign up for the Liberate your Art Postcard Swap. Tomorrow I’ll share the final count and the updated link list. I’m so excited!

Filed Under: The Kat Eye View of the World Tagged With: black and white, church, clouds, Inverness, river, Scotland, silhouette, sky

March 9, 2011 by Kat

The Calm Before Dawn

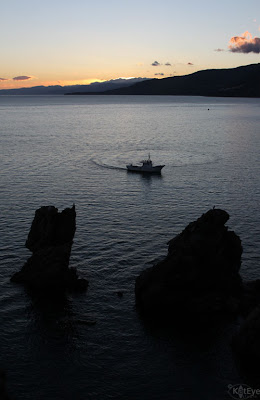
I am an early riser. This becomes very apparent when we are on vacation and the alarms are turned off, yet I wake well before the rest of my family. This morning on our recent trip, I woke to see the sky beginning to lighten, and decided to get up to watch the dawn from the balcony of our room on the Tyrrhenian coast of Sicily. I watched as the clouds began to glow and the fishing vessels came out to start their work day. This boat did an interesting circle before moving on, can you see the remains of the wake? Such a calm and peaceful moment, it fills me with quiet joy even today. I hope it does the same for you!

The Exploring with a Camera: Capture the Sky link closed this morning. Have you seen the amazing images that were shared? If not, I encourage you to take a look at this link up and see the wonderful interpretations for Capture the Sky. They were breathtaking. I so enjoyed this theme, and greatly appreciate the wonderful participation from all of you.

Tomorrow will be a new Exploring with a Camera, come back for an exploration of photos in Square Format. See you then!

Filed Under: The Kat Eye View of the World Tagged With: boat, Cefalu, Italy, sea, Sicily, silhouette, sky

March 1, 2011 by Kat

The View from the Top

Last week, when looking for a photo with words on it to link in to a Shutter Sisters prompt, I realized that I never posted this. I showed the image before the words some time ago, but in some ways the words transform this photo. They are a reflection of the emotion of my son in silhouette. On top of the world!

I’m off on vacation this week, but I wanted to share this image as another way to Capture the Sky. Creating a blank space in your photos with a clear sky is a great way to “reserve” the space for later use, like the addition of the quote. It’s also interesting to see the tones you can get from the sky when an image is converted to black and white. The sky did not appear this dark in the color version, but it provides a perfect place for white text.

Filed Under: The Kat Eye View of the World Tagged With: Alpe di Siusi, black and white, Italy, silhouette, sky

February 27, 2011 by Kat

Sunrise Sky

It’s amazing how many sky images are popping into my head, since I wrote the Exploring with a Camera: Capture the Sky post on Thursday. This one is from an early morning walk in Parco di Monza. I remember the morning well, I had to get up early to take Brandon to school for a field trip and started my walk just before sunrise. It was early, but the time paid off in the form of a gorgeous sunrise, and one more beautiful sky to share with you.
Stop by Ashley Sisk’s blog Ramblings and Photos today, to visit all of the photographers who are linking in their “Capture the Sky” images as part of her Scavenger Hunt this week. Thanks Ashley, for including Exploring with a Camera! I look forward to seeing all of the sky images the participants have captured.

Filed Under: The Kat Eye View of the World Tagged With: clouds, Italy, Parco di Monza, pink, silhouette, sky, sunrise

February 24, 2011 by Kat

Exploring with a Camera: Capture the Sky

Welcome to Exploring with a Camera! Today I’m going to talk about capturing the sky. The sky is a subject that I’ve  been fascinated with over the last few months, and I wanted to share what I’ve learned through observation. This post has a lot of information, and at the bottom you will find a link tool where you can link in your sky images to share too. I hope you will include any tips or personal observations you have, and increase the knowledge through the power of a community.

What is it about the sky that is so fascinating to me? I think because it is always changing, it is always interesting. The sky is never the same. The weather and clouds, the change in light from the time of day and season, and where you are located all have a dramatic impact on how the sky looks. Not only that, compositional choices, camera settings for exposure and post processing can have a big impact on the final appearance of the sky.

Here are a few things I’ve noticed…

Big Sky

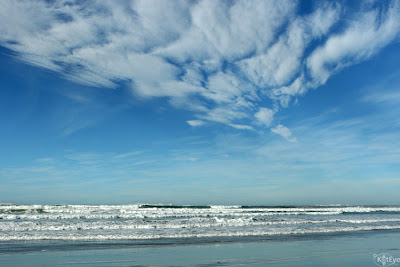
The image leading this post off is an example of what I call a “big sky” image. Captured on the Oregon Coast in 2008, this wonderful sky has stuck in my mind. Why does the sky feel so big in this image? First, the photo was taken with a wide angle (short focal length), which enables the capture of a lot of space. Second, the horizon is positioned low in the image, so the the sky is dominant. Finally, you can’t ignore the effect of the cloud formation. The formation itself leads you into the distance and gives more depth. I want to mention that I did boost the color in this image, to emphasize the blue of the sky.

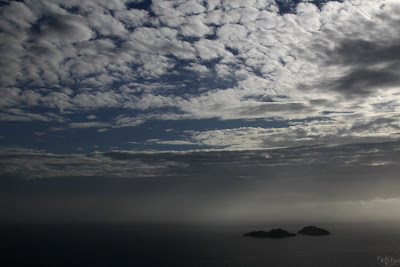
Here’s another big sky image, from the Amalfi Coast of Italy. This image is similar to the Oregon Coast image, not only in subject, but in the focal length, placement of horizon, and interesting cloud formations.

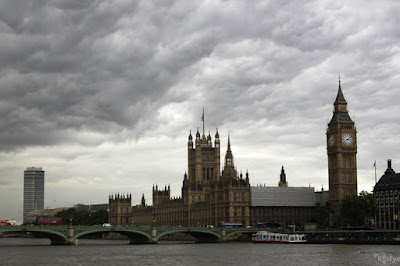
Big sky images don’t have to be of nature, they don’t even have to have blue sky in them. This image of London is a great example of a big sky in an urban environment. The same elements, wide angle and low horizon, apply to this image as well.
You don’t have to have clouds to capture a big sky, that just seems to be what I am drawn to when I capture the sky. I hope some of you will share some cloudless skies in the link tool to provide examples.

Orientation

How you choose to compose your image, horizontal (landscape) or vertical (portrait) orientation, has an impact on the feel of the sky. The image below, of the sky above Mt. Vesuvius in the Bay of Pompeii, emphasizes the height of the sky, rather than the width or expanse as seen in the previous images. The vertical format compresses the depth of the clouds coming toward the viewer to create height.

Here is another vertical example, above the Swiss Alps. I find it interesting how both of these images make the sky and the clouds seem so large compared to the massive mountains. Note that both also use a low horizon, to emphasize the sky.

Contrast

When capturing the sky, I like to have something to provide contrast to the sky itself, something to ground the image and provide a frame of reference. I find I ground my images with a piece of something real, even if I don’t include the horizon. The tree in this image of sky from Madrid grounds the image, giving a little bit of context without changing the focal point.

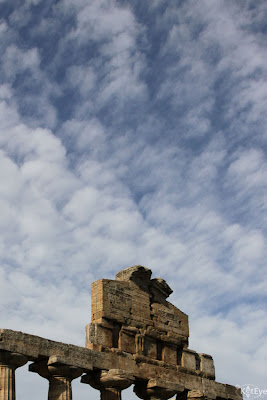
And if you can have an interesting object help ground your sky, why not? This ancient Greek temple in Paestum, on the Amalfi Coast south of Naples, both grounds and provides a point of interest to the fabulous sky on this day.

Contrast that with a slightly wider angle crop, below, and you can see the difference in the focal point of sky versus temple. The sky is still an important feature, but the temple becomes the primary focal point.

Slice of Sky

You don’t always have the luxury of having a broad view of the sky to capture. You can create equally interesting sky images by catching a slice of the sky. These images are trickier for exposure, since you have a bright sky behind often significantly darker surroundings. My camera light meter will always choose an exposure in this situation that results in an overexposed sky, so I deliberately underexpose. This will make the foreground darker, but the correct exposure on the sky will make it the focal point.
Here is an image from an early morning walk in Parco di Monza. The slice of sky is the dominant feature in the image, but there is context in the foreground.
The image below comes from an especially frustrating evening walk in Lisbon. I could tell the sky was gorgeous with the clouds and golden light, but I couldn’t get anywhere I could capture the broad vista I wanted. There were buildings all around, everywhere I walked. Instead of the big sky, I focused on a slice of sky. I like this image for the subtle details of the city in contrast with that gorgeous sky.
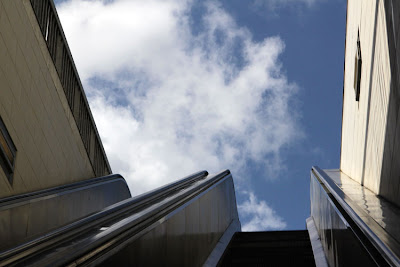
This slice of sky, the view when exiting from a Paris Metro station, gives me an interesting feeling of emerging. The looking-up perspective and escalator provide the context that changes the image from a standard sky shot to something more unique.
Reflections

The sky in reflection is gorgeous. Water reflections are a great tool to expand the impact of the sky in an image. In this image of the Venetian Lagoon, the reflected rays of light and colors of the sky continue the effect of the sky through more of the image. 

Using selective color processing on a reflection of the sky can completely change an image. In this image of my son from 2007, I loved how revealing only the sky in color gave me a feeling of springtime hope and moved the focal point to the sky in reflection.

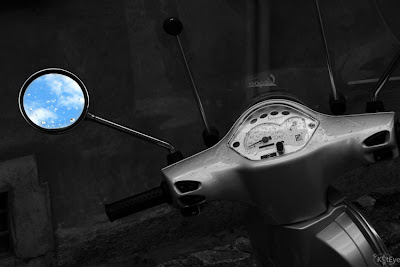
I like this sky reflection from a modern Vespa for a couple of reasons. First, you can see that it has just rained from the drops on the mirror but the sky is reflected blue – things are clearing up. Second, a modern silver Vespa, while unique if you are from the US, is not all that interesting on its own. This sky reflection provides significantly more interest to the photo.

Backdrop

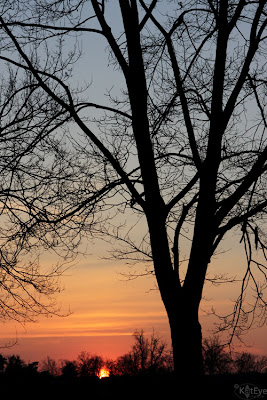
Finally, I want to explore the sky as a backdrop. Sometimes an image just doesn’t work without the backdrop of the sky. It may not be the focal point, but an interesting sky in concert with other elements make a great image. This Parco di Monza sunset image needs both the sky and the tree in silhouette to work.

The focal point in this image is the life boat on the Ferry from Italy to Croatia, but the light in the sky is what makes it interesting. Can you imagine this without that light? I can, and it’s not anything special in my mind’s eye.

I have taken lots of images of church steeples and domes and monuments, and I can tell you this: the sky makes or breaks the shot. This evening sky in Split, Croatia makes all the difference between a ho-hum church steeple and a marvelous evening shot.

So, what skies attract you? Is it cloudless skies of blue? Stormy, threatening skies? I would love to see your images. Let’s see how you capture the sky.

You can link in your images below, link will stay open until March 9. All images, recent or archive, are welcome. If you viewing this post in a reader, click here to come to the blog to see the link tool. I would love it if you would include an Exploring with a Camera button with your image, you copy and paste the button code from here.

Filed Under: Exploring with a Camera, The Kat Eye View of the World Tagged With: clouds, Italy, Oregon, Portugal, reflection, silhouette, sky, sunset

« Previous Page
Next Page »
  • Email
  • Facebook
  • Instagram
  • RSS

Resources

search

Archives

Filter

© Copyright 2017 Kat Eye Studio LLC