Kat Eye Studio

  • Home
  • Portfolio
  • Resources
    • Online
    • Books
    • Workshops
  • Blog
  • About
    • Artist Statement
    • Background & Experience
    • Contact

January 27, 2011 by Kat

Exploring with a Camera: Fog

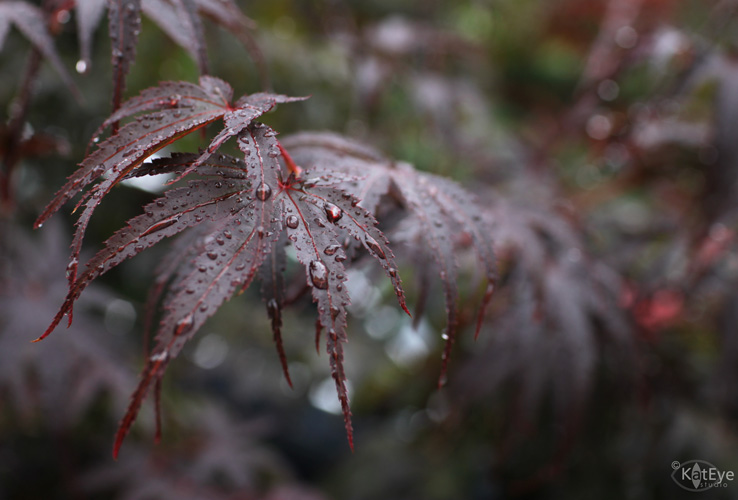
Winter brings fog, one of the most wonderful weather patterns for photography. I know I’ve said it before here on the blog, but I love fog!  Because you can only see what is right in front of you, there is a delicious sense of mystery, of things slowly revealed.

Fog forms when there is high humidity along with a temperature that is very close to the dew point, it is essentially a low lying clound. You can read more about the science of fog here. It will form readily near bodies of water, like lakes and rivers, and in cooler temperatures. That’s why you often find fog early in the morning, dissipating as the weather warms up.

I’ve had the good luck to live two places now where fog is common: Oregon and northern Italy. It forms frequently here at my house in Italy, since we are right near the large Parco di Monza through which the Lambro River runs. A large, natural open space is a great source of fog – temperatures are always cooler in the park and the moisture is abundant from the landscape.

How can you use fog as an element in your photography? Here are a few ideas…

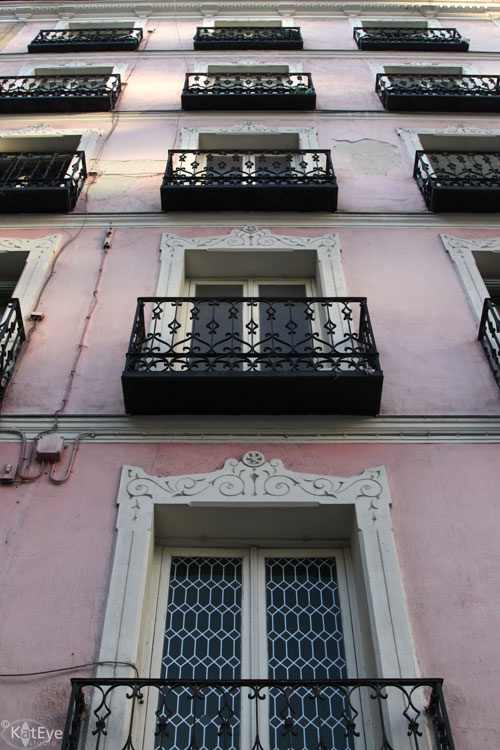
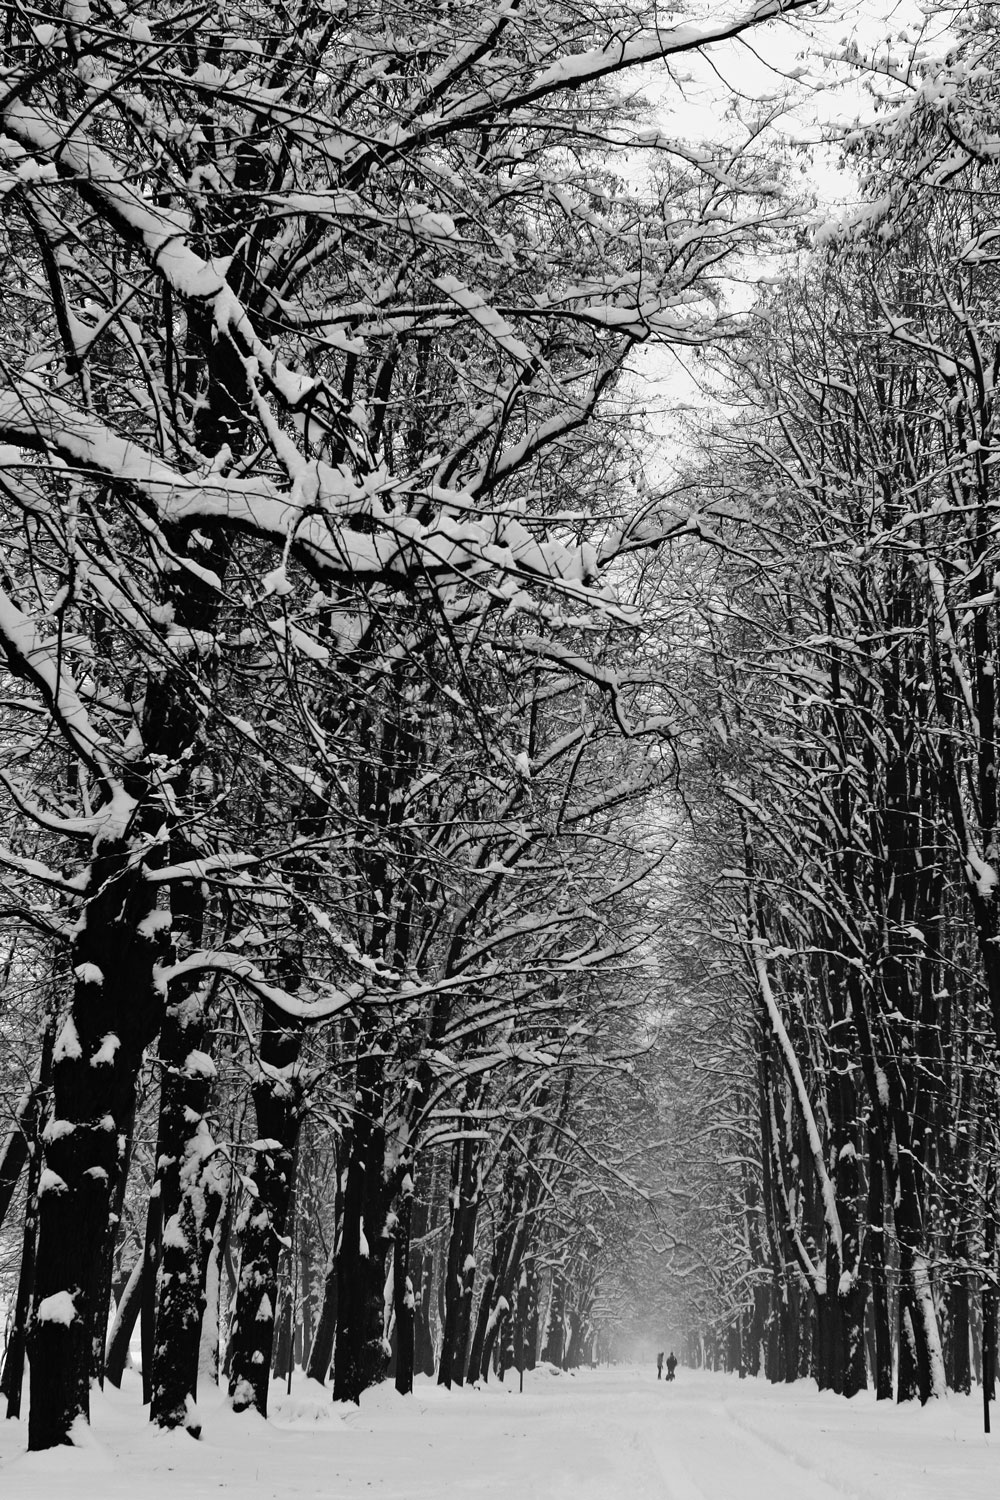
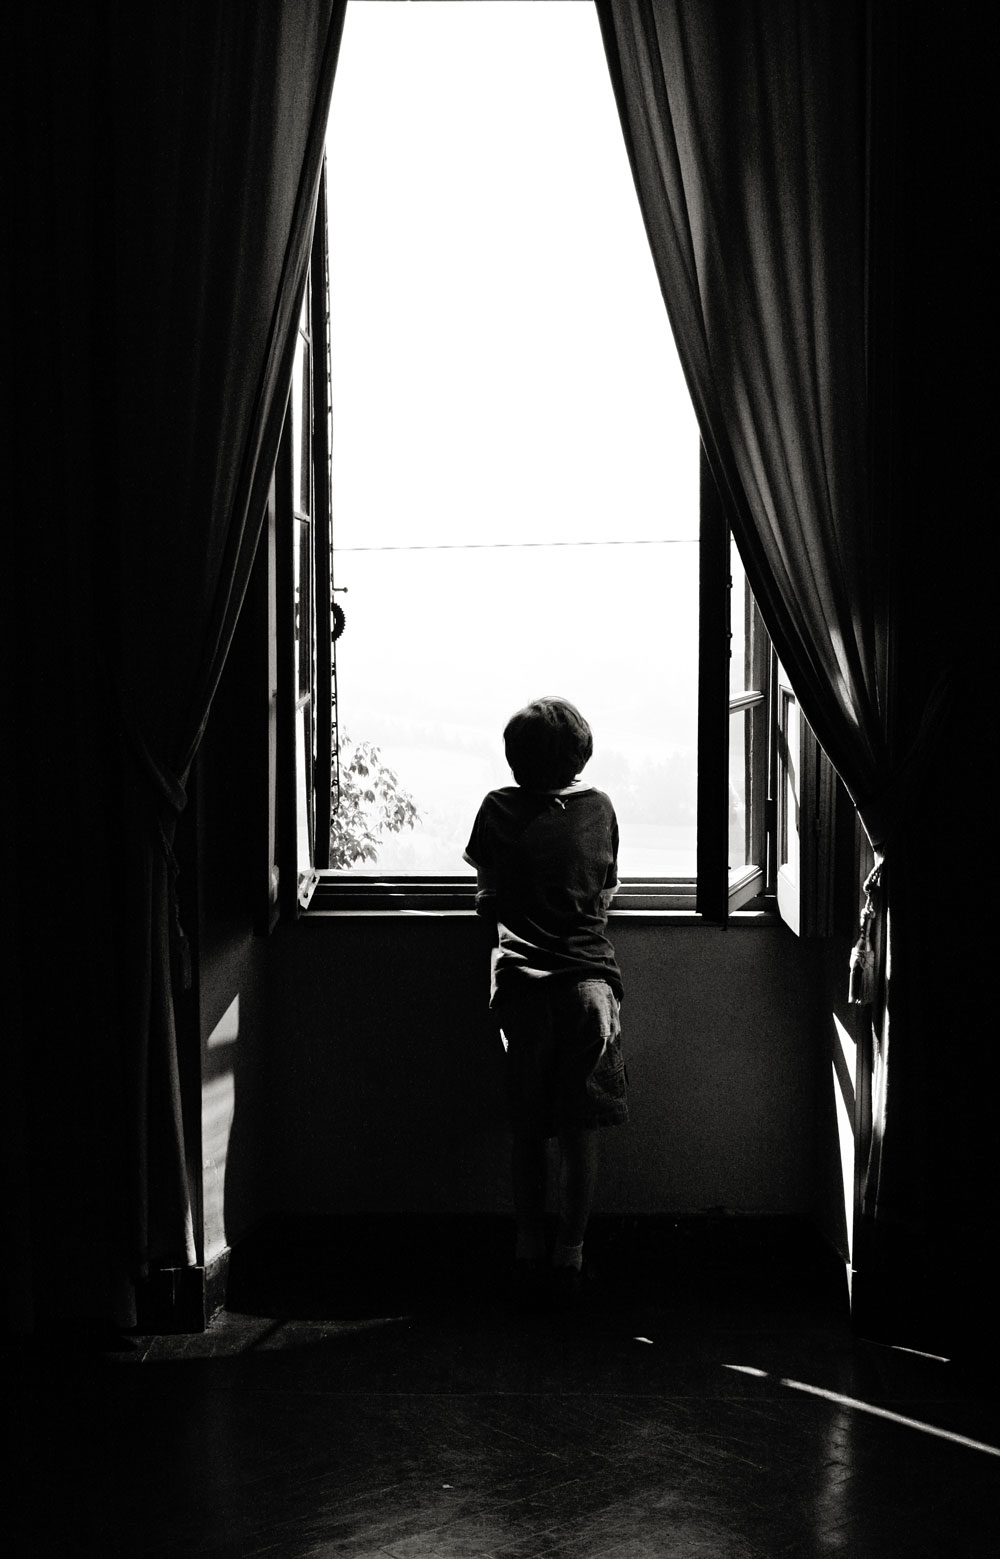
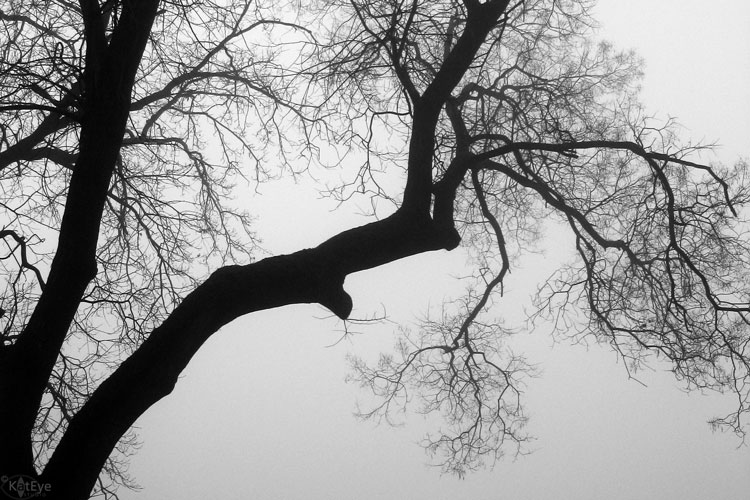
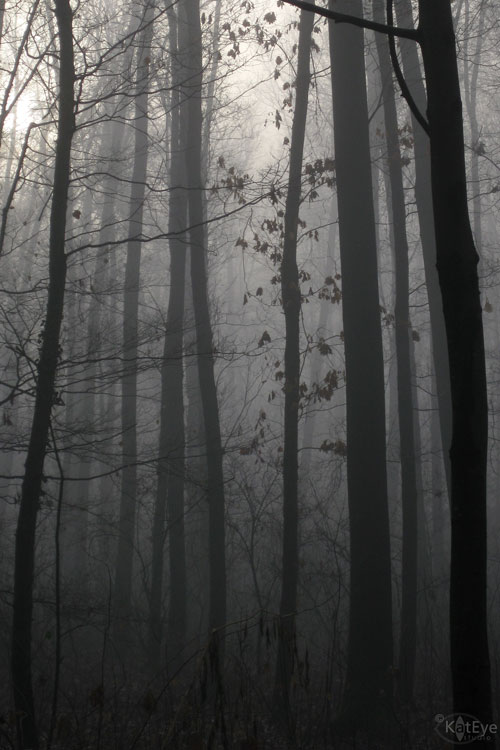
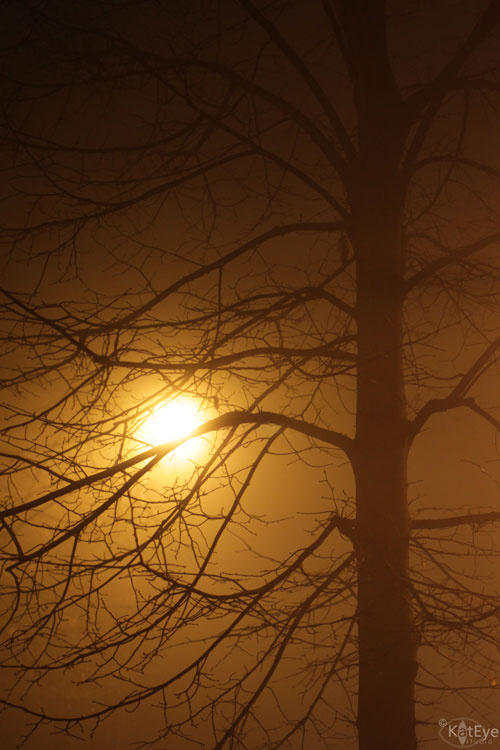
Fog provides a great backdrop, to capture a single element. A distracting background can be completely hidden in the fog. I use this feature to capture silhouettes, like the lead-in image of the post and this image below. The detail is highlighted by the blank backdrop. I also converted both of these to black and white, to heighten the contrast. One thing to be careful of with fog is underexposure, because the light white background will dominate your camera’s meter readings. Play around with overexposing your images just a little bit to compensate.

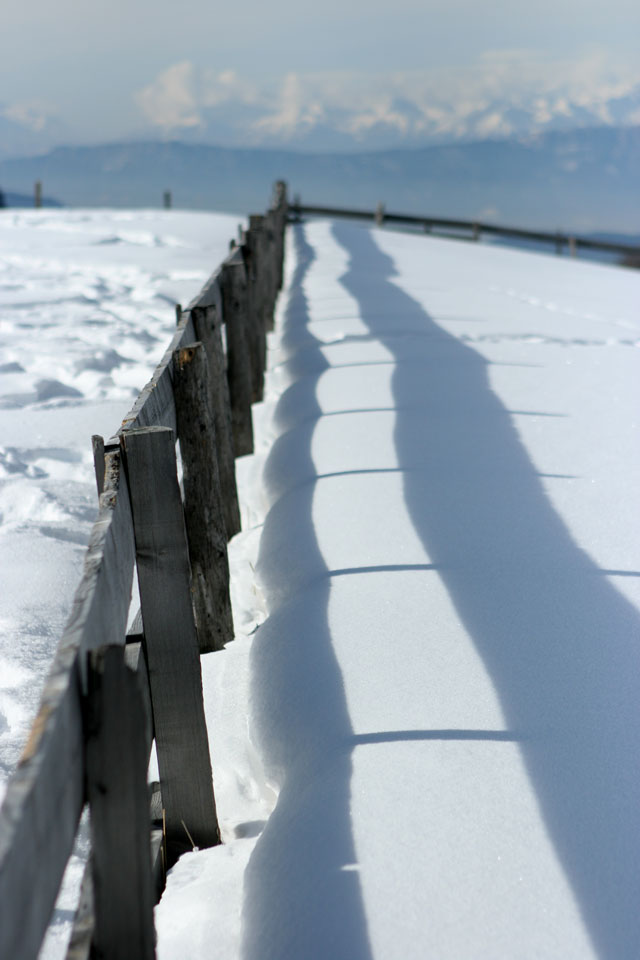
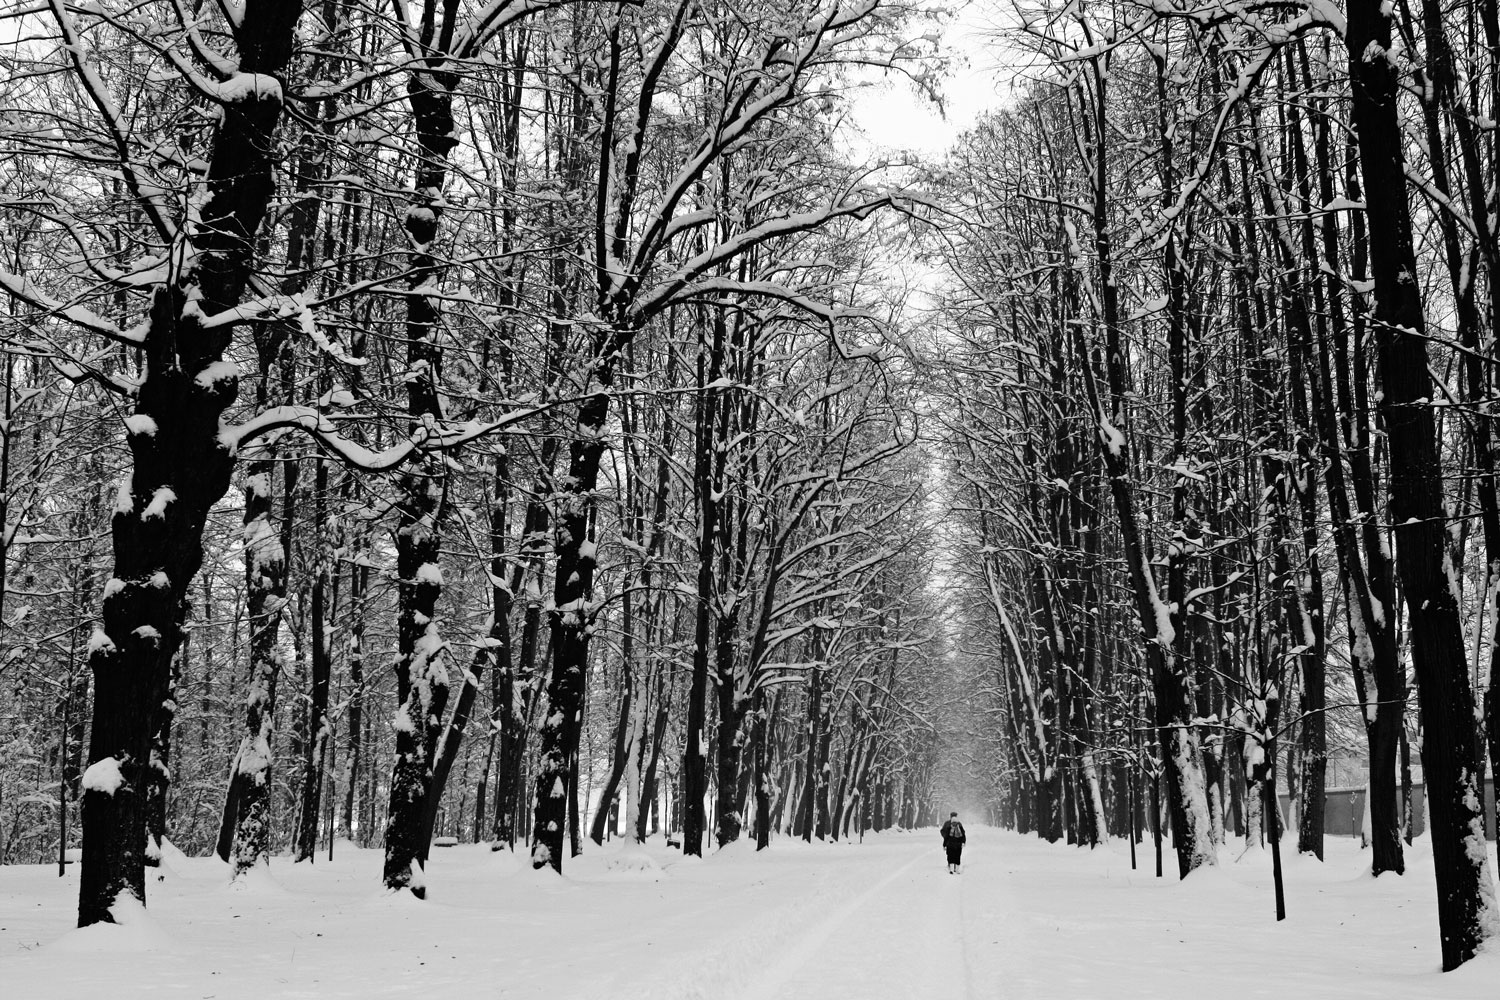
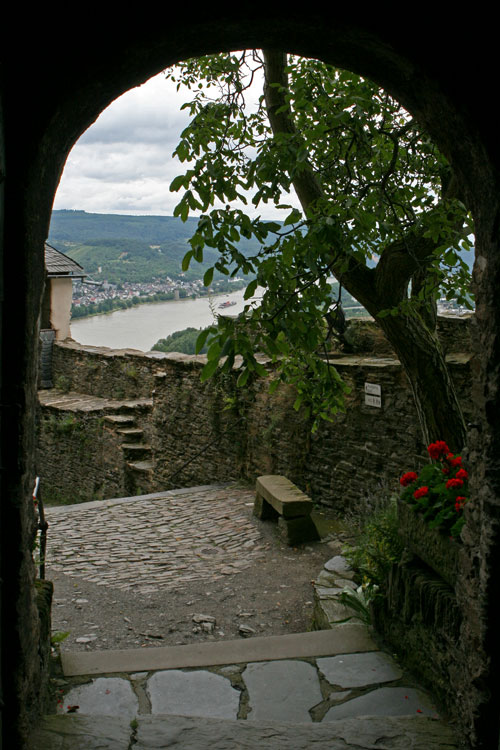
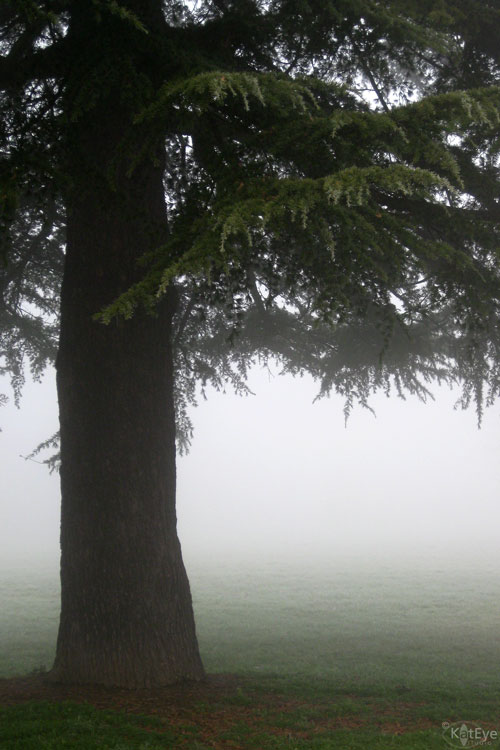
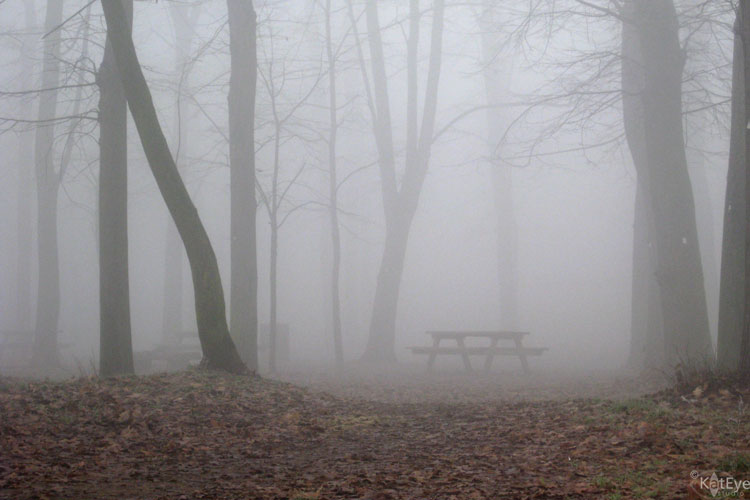
As you move closer to a object, fog slowly reveals. Vary your distance to a subject to create a different effect and feel in your images. The two images below are of the same tree on the same day, but taken at different distances. The first one,  farther away from the camera, creates that sense of mystery I was talking about earlier.

For both of these images, I again converted to black and white to heighten the contrast. Fog desaturates colors and your images can look almost black and white straight out of the camera, but converting to black and white can keep the focus on the shapes and tones rather than what little color remains.
You can use fog to get a sense of depth in your photo. While photographers often manipulate the depth of field through aperture, you can also create depth using the atmosphere. Fog creates depth by successively lightening the objects in the background as you move away from the foreground. You can see this effect in the image of the trees below.
Light fog can give a subtle effect, as in the next example. Along with placement, focus and color, the sense of the largest tree as the focal point is enhanced by the fading trees behind.
Heavy fog can make depth obvious, even at short distances. This image of a tree shows the effect of a heavy fog, the back of the tree already fading significantly compared to the front.
All of these examples so far are from farther away, what happens when you get up close? You can see condensation on the surfaces. Get in close to see what I call “beads of fog” on the smaller objects around you.
I’ve talked about what is revealed as you move through the fog, but also consider what is revealed as the fog is lifting. This image, taken looking up through the fog, shows the blue sky peeking through as the fog is burned away by the sun.

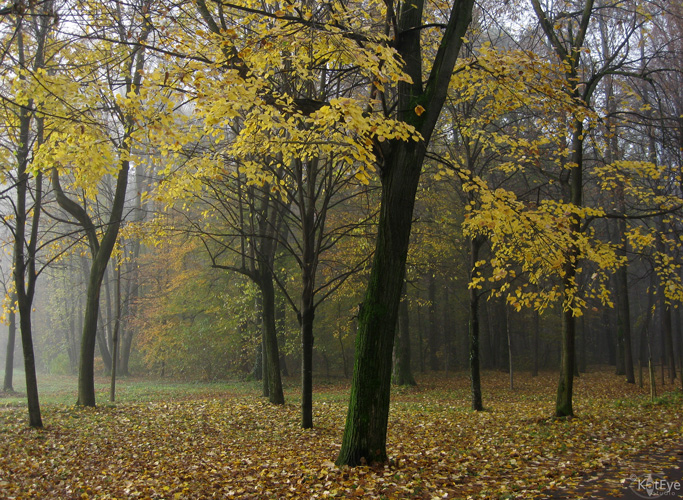
In this image, you can see how interesting it can be to capture the sun through the fog. This was an unusual day, because the fog seemed to be disappearing from the bottom up rather than the top down.

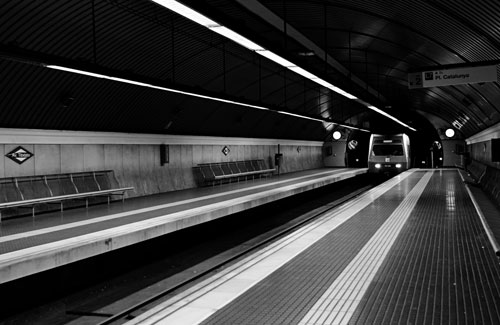
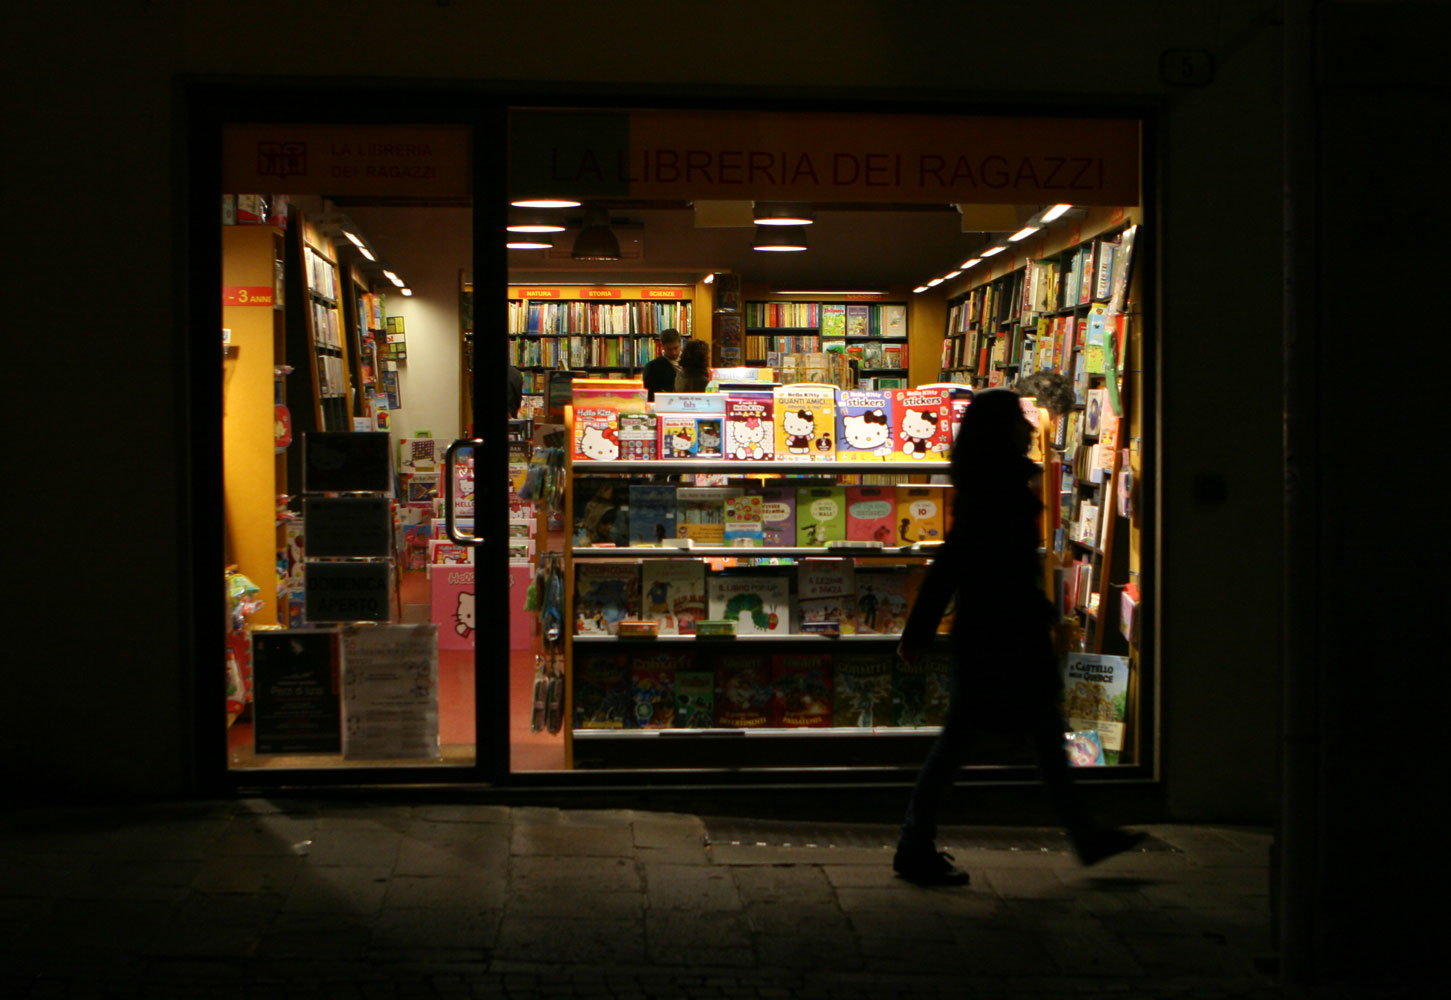
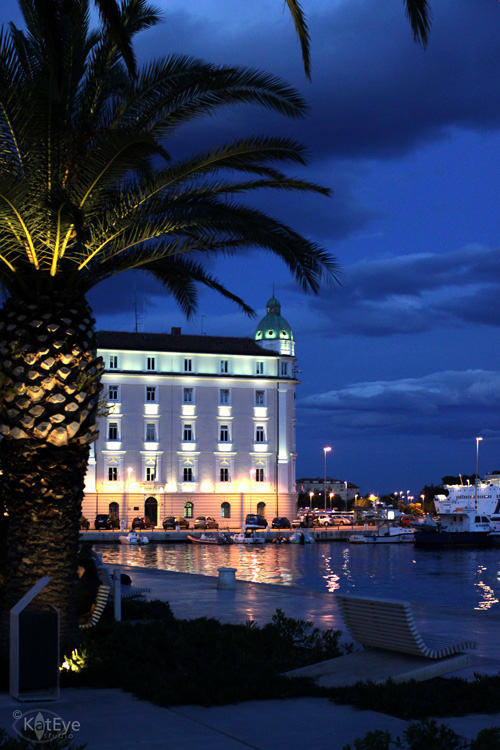
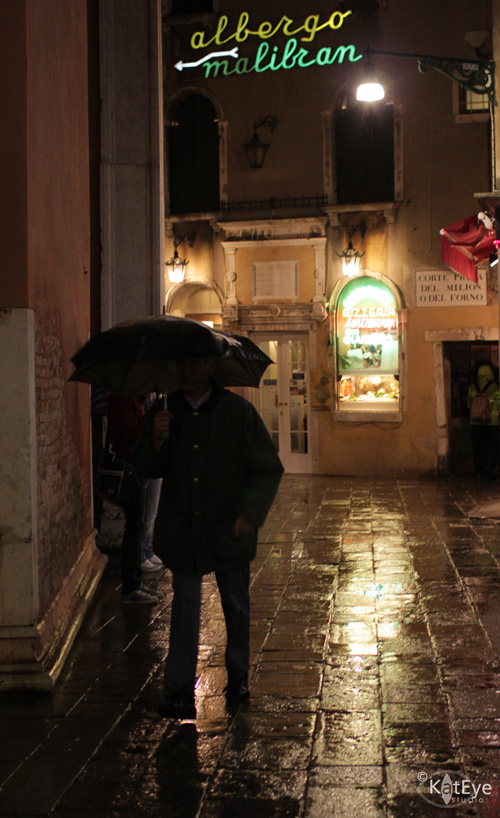
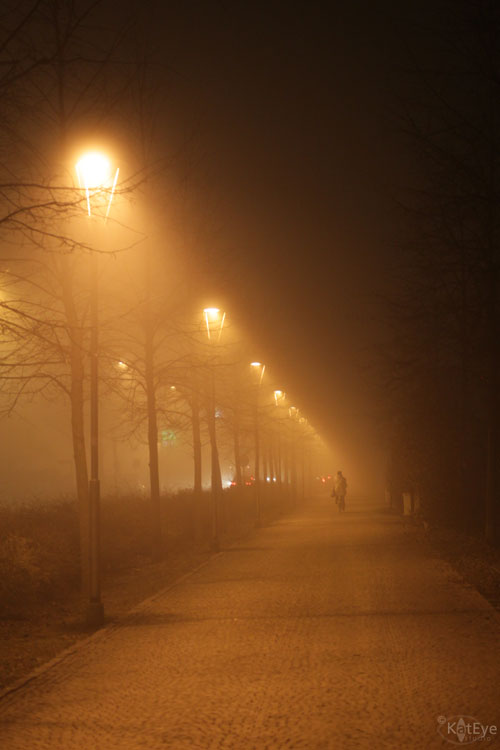
Finally, don’t forget about capturing the world in fog at night. You know I love night! Fog seems to amplify the artificial lights of night, creating a warm glow that is unlike any other night effect. I did no color or exposure correction on these, I liked them as they came out of the camera.

I know many of us are anxiously awaiting summer for the warmth and light of the sun. Instead of focusing on what you don’t have right now, take a moment to celebrate fog, one of the delightful gifts of winter.

Today I am going to try something different! As a welcome to the participants in the Scavenger Hunt from Ashley Sisk’s Ramblings and Photos, I’m going to open the linky today and keep it open for two weeks. (If you are in a blog reader, come over to the blog to see the link tool.) I’ll still post the linky next Thursday for Share Your View as usual, if you want some time to capture the fog or look through your archive.

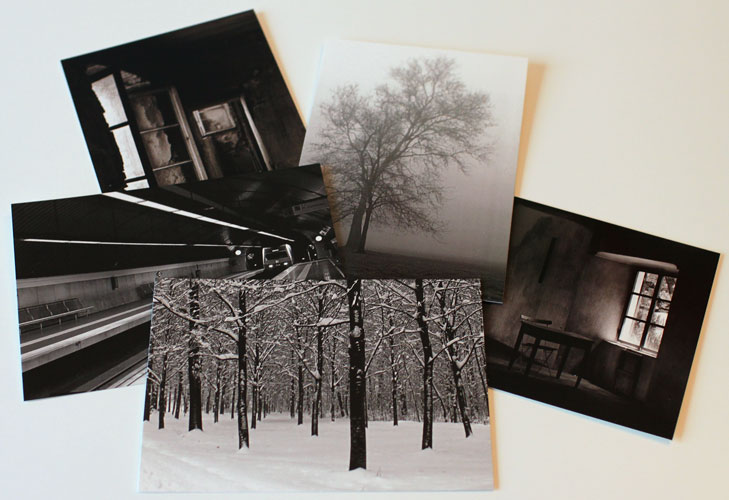
In addition, I’m going to give away a set of my Black and White postcards by random drawing to one person who links in a fog photo. I haven’t given away a set of these yet on my blog, and since this set includes the foggy tree image it is the perfect time to give these away.

Thanks for sticking with me! Good luck with your fog photos, I look forward to seeing what you capture. You can find the code to copy and paste the Exploring with a Camera button on your blog here.

Filed Under: Exploring with a Camera, The Kat Eye View of the World Tagged With: black and white, fog, giveaway, night, Parco di Monza, postcard, share your view, silhouette, tree

January 13, 2011 by Kat

Exploring with a Camera: Linear Perspective

I am so excited to share a new Exploring with a Camera today! The topic of Linear Perspective has been rolling around in my head since December for a new exploration, and I’m happy to let it free this morning.

Perspective is such a cool compositional concept! It takes advantage of how we see, the optical effects of lines over a distance. I remember learning the concept of perspective way back in my early art classes: Lines, when viewed across a distance, will converge to a vanishing point. Below is an example, from the Barcelona subway. If you were to continue all of the light lines in this photo, they would all meet somewhere at the edge of the tunnel. The perspective of the converging lines brings your eye right through the photo toward the vanishing point in this case.

When drawing, you need to make sure that your lines converge correctly or the drawing will look odd to the eye. In photography, we don’t have to worry about “making” the lines converge – they do that already – we can just take advantage of the effect. I’ll give you a few examples and variations on how to use linear perspective in your photographs.

Distance


To use perspective bring a sense of depth, include a long distance in the photograph so that the lines can converge more dramatically. This often means using a wide angle (smaller focal length, i.e. 24mm) instead of a zoom (longer focal length, i.e. 100mm), so that you capture the length of the diminishing lines. In the photo below from the Italian Alps, the diminishing lines of the fence give a sense of dramatic depth even though my depth of field (how much is in focus) is actually quite shallow. If I were zoomed in on the fence without the long lines moving into the distance, the photo would have a completely different feel.

Orientation


The orientation of your photograph, horizontal (landscape) versus vertical (portrait), will change how perspective effects the image. In the two examples below from Parco di Monza, note how the horizontal image emphasize the lines of the path while the vertical image emphasizes the height of the trees. Both use the diminishing perspective of the path and the trees, but in different ways. Placing a figure just about in the vanishing point makes for an interesting place for your eye to rest as it moves through the photo.

Composition


You can use linear perspective in so many different ways to get good composition – this is the really fun part! You can move the vanishing point in a photo to get dramatically different effects. Look closely at the examples above and below to see how the diminishing lines are used compositionally.

The photo below is from the Royal Palace in Madrid. The composition is very symmetric, with the lines converging in the center between the left and right. It is not symmetric from top to bottom, however. The focal point of the end of the hall is around the bottom third of the photo.

Here is another photo, this time from Amsterdam, with a left to right symmetry of the linear perspective.

This image from Parco di Monza is interesting – the perspective is symmetric left to right, but the leaf (the real subject) is not centered. The perspective here is not the focal point of the photo, it’s the backdrop for the leaf, but it certainly makes the photograph more interesting.

While a symmetric perspective can certainly bring a sense of peace and order to a photograph, linear perspective certainly doesn’t have to be used symmetrically. This image from the Berrardo museum in Lisbon, Portugal is more asymmetric in it’s lines.

Putting the vanishing point at the edge or corner of an image can make it very dynamic. I love the way all of the lines converge in the corner of this photo from Paris. The contrast of the repeating pattern of the fence provides an interesting counterpoint to the linear perspective. I’ve noticed in many of my photographs using perspective I also use repeating patterns, a topic I covered in an earlier Exploring with a Camera post.

You can also vary the point of view and effectively use converging lines. The lead in photograph of windows in Madrid or the skyscraper from Barcelona below are two examples of linear perspective looking up. The skyscraper below has an asymmetric composition while the Madrid window image at the top of the post is symmetric left to right. (I seem to like that composition!)

Isn’t this fun? Take a look at the world and your photos this next week with an eye toward linear perspective. You can come back next Thursday to link in and Share Your View. I can’t wait to see what you find!

If you would like a button to put on your blog to show your participation, you can find the code to copy and paste here. If you are participating in a 365 or 52 project, I hope you will also share Exploring with a Camera in these groups. A little creative inspiration can really help in a long haul project over the course of the year.

See you all soon!

Filed Under: Exploring with a Camera, The Kat Eye View of the World Tagged With: lines, Lisbon, Madrid, perspective, Portugal, Spain

December 2, 2010 by Kat

Exploring with a Camera: Holiday Lights

Filed Under: Exploring with a Camera, The Kat Eye View of the World Tagged With: aperture, bokeh, christmas, holiday, light, night, reflection, shadow

November 4, 2010 by Kat

Exploring with a Camera: Frame within a Frame

“Frame within a Frame” is a compositional technique that I’ve had on my mind to share here, but was waiting for the perfect “frame” shot to lead off with. I found it in this shot from Bologna, looking through a bridge window into the buildings and canal beyond. Now that I’m writing this post and reviewing my archives, however, I am seeing that I use this technique more than I thought!

Frame within a Frame works for a couple of reasons:

  • First, it serves to focus the eye of the viewer on a specific subject. When you look at a frame within a frame photograph, you are usually drawn directly to the frame and what is inside of it. Then you kind of visually take a step back and take in the whole of the image. In the photo above, you are immediately drawn to the jumble of windows and walls and the distant bridge within the frame. Then you back out and see that you are looking through a wall with graffiti.
  • Second, it provides context for the image. You are looking through one thing – the frame – into something else. You have a better feel for where you are, as the viewer. It places the viewer of the photograph into a slightly different role. Instead of just looking at the photograph, they are looking through the photograph, from the frame into what is beyond. They are immersed in the image more completely. 

The “frames” that are within photo don’t have to be windows, although these are used to good effect. Basically you are looking  for anything that serves to contain or frame the subject. The nice thing about a frame within a frame is that it doesn’t have to be a straight line! The edges of our photographs are typically straight lines, with rectangular or square shape. Compositional frames we can use within our photographs can be any shape, from natural or man made.

In this image the eye is immediately drawn to the subject framed in the “white” of the overexposed window, and from there you move into the room to get the context of the boy (my son) standing at this very large window.

In this image from Padova, the subject is the bookstore, but the context is provided by the frame of the store window at night. The person walking by serves to punctuate the fact that we are looking into the store from outside.

I find that I use arches all of the time in my photography to frame a subject. It helps that they are almost everywhere in Europe! An arch is a nice contrast to the rectangular shape of the photo, as shown in this image from Brescia.

And here is one from Marksburg Castle, in the Rhine River Valley of Germany. This arch frames both a near and far vista, looking down the Rhine. It shows the strategic view the castle had of the surrounding area.

Yet another, this time an arch internal to the building, at Casa Battlo, in Barcelona. This arch frames the beautiful lines of the staircase curving upward.

Don’t ignore the good old, square doorway though! This doorway serves as a frame, giving more depth to the alley beyond and leading your eye right to the window at the end.

Natural elements make great frames. I think you can probably conjure up images you’ve seen or captured looking through trees at a distant object or vista – the trees are the frame. The palm tree in the image below from Split, Croatia serves to frame the subject of the lighted building while also giving the context of where the photo was taken from, the waterfront promenade. I have photos of this building without the palm tree, and they are not as interesting as this one.

This may be a familiar photo to you, as I’ve used it in Exploring with a Camera before. The branches of the trees arching over and hanging down to the water, along with the reflections completing the the arch below, serve to frame the path and draw your eye right along it to the water beyond.

Finally, here is a more literally frame within a frame from Bologna. Instead of looking through the frame, you are looking at what is inside the frame. It takes the random jumble of advertising, ties it together and gives it context. It becomes street art on it’s own.

So, now that you’ve seen a few examples of frame within a frame, how can you use this compositional technique?

  1. The easiest place to start is to look for the obvious in our everyday lives – windows and doors. Look at these as frames. What do you see when you look through them? What do you see reflected in them? Consider the point of view from both sides of the frame – looking out and looking in.
  2. Expand beyond the obvious to look for other opportunities for frames in our everyday spaces – hallways, mirrors and furniture are a few places to start. What other ideas can you come up with?
  3. Look for frames in architecture. As with arches, architectural elements can make great frames for something beyond, as well as provide the context of where you are at when you take the picture.
  4. Look for frames in nature. Trees make great frames, what other natural elements can you use to highlight your subject?
  5. Try changing your focus point and exposure – focus on the frame as the subject, focus on the image beyond the frame as the subject. What works best? Why? For many of my Frame within a Frame images, I have done both and then picked the one that had the best feel.
Chances are you are already using this compositional principle without thought, as I was. Take a look at your photos, and see where you have used frame within a frame and what effect it had. Keep an eye out, notice how it is used in the images you see around you everyday on the web, in print, in TV and movies. Try to consciously use it this week if you can. Next week, you can come back and share your view here, I can’t wait to see what you’ve captured!
P.S. I am no longer going to be using the Flickr group for sharing, it just hasn’t gotten any traction, probably because I’m not loving it. We’ll continue with linking in to the Share Your View follow up posts instead! If you have suggestions for other linking tools, please let me know. I’m looking at trying some different ones. Thanks for your participation!

Filed Under: Exploring with a Camera, The Kat Eye View of the World Tagged With: Bologna, Croatia, frame, Germany, Italy, Marksburg Castle, Rhine, Split

October 21, 2010 by Kat

Exploring with a Camera: Rain


With the change in seasons, in the places I’ve lived the last 12 years or so, we wave good-bye to the consistently sunny days and welcome the wet. Rain will be a consistent part of life for the next few months as winter comes on, with the occasional break in the monotony for snow or sun when we’re lucky. A rainy day is a great time to curl up under a blanket, with a book and a cup of tea. It is also a great time to get out and photograph!


A while ago I wrote a blog post that said when life gives you rain, you should take photos anyway. Today let’s explore the ways to capture the beauty to be found in the rain…


The light is completely different in the rain. First off, it’s usually cloudy during the day, which provides softer, indirect light. Second, the wet surfaces reflect the light in completely different ways than dry surfaces. The photo at the top of the post is a good example of this – the leaf and the stones are highlighted by the reflections of the light. What would be an interesting composition for it’s contrast when dry, gains even more interest for the way the individual elements stand out from the light on the water.


This photo from Orvieto, Italy is a daytime example of how the wet ground reflects the light, drawing your focus along the ground from the bright doorway in the top left down toward the scooter in the bottom right.
The wet ground in this photo of Bath, England at night serves to contrast and highlight the row of benches along the sidewalk. As I mentioned in my Exploring with a Camera post on Night Photography, wet surfaces at night can add much needed light for taking photos at night.

Not only is the light reflected, but you can great image reflections as well with a smooth surface or a puddle. The thin layer of water on this smooth concrete makes a wonderful mirror for the leaves on the ground.

This puddle in Piazza San Marco in Venice serves to reflect the geometry of the famous tables and chairs, making a more interesting composition than the tables and chairs alone.

And while we’re talking about puddles, how about capturing some splashing through them? Of course, this image is a bit more sedate than most puddle-splashing pictures, a capture of Italian rain fashion more than splashing but you get the idea. The movement of water in the puddle along with the reflections makes the photo more than just photo of rainboots.

Out in the rain, look for ways the water moves across and off surfaces. This restaurant table was so highly polished that the rain water beaded up into interesting shapes, a nice backdrop for the flowers.

Look for the drips ready to fall…

Look for the drops that grace the leaves.

It’s also fun to capture people in the rain. They are more “anonymous” with their hoods and umbrellas, hunched up and hurrying along. I like to capture groups of colorful umbrellas, as on this bridge in Lucerne, Switzerland.

Or the lone traveller, trying to get someplace at night in Venice. People with umbrellas are quite the artistic staple, if you look at paintings through history.

Here we have quite a few different elements that I love in one rainy shot… umbrellas, multiple reflections, at night, and it’s Venice. How could you go wrong?

There are so many ways I have yet to capture the rain, these are the images I’m still looking for:

  • Looking out of a window covered in raindrops. Focus on the drops, with the scenery out of focus behind.
  • Rain spilling out of our very cool dragon-shaped rainspout or off the edges of eaves.
  • The rain in a downpour – I want to figure out how to capture the “look” of the world when you look through rain.
  • Drops of rain splashing in puddles – oh those perfect, rippling circles just tantalize me!

So, how do you do shoot in the rain without ruining your camera? Here are a few tips:

  1. Use an umbrella. If you have someone along with you, ask them to hold it over you and your camera when you shoot. If you don’t have that option (or don’t want to ask your companions to hold your umbrella every 15 seconds), a bigger umbrella works better than a small one for this “solo” technique: Rest the handle between your neck and shoulder with the umbrella resting on the top of your head. This will enable both hands to be free and your camera to be covered while you shoot. It does take some practice though!
  2. Find sheltering spots. Store awnings and overhangs, doorways, under trees, etc. can be great places to pause and have a little bit of protection from the rain while you shoot. Watch out under trees though – the drops might be less frequent but they are often bigger!
  3. Keep your camera protected between shots. Work out a system that enables you to quickly and easily but your camera in and out of your bag. I carry my camera across my body, and my camera bag the same way. I can take my camera in and out of my bag easily, so when it’s rainy I can put it away between shots but easily get it out for the next one. Another thing I will sometimes do, especially when it’s light rain, is just tuck the camera between my body and the bag. It’s mostly protected but easily accessible. When it’s heavier rain though, I keep it in the bag!
  4. Use a camera cover. You can buy rain covers for your camera, but I’ve found them to be kind of pricey and I don’t want something bulky I have to carry around “just in case” it rains. Another practically free alternative for an SLR camera is to use a plastic grocery bag (you know, the ones you get in just about any grocery store) and a rubber band. Tear a hole at the bottom of the bag near one corner, this is where you put the lens looking out. Use the rubber band to secure the bag at the end of your lens, then just wrap the bag up around the camera with the handles coming around the back. When you want to shoot, just open up the handles and hold the camera as normal inside the bag. It might look weird, but it’s cheap and easy, and a spare bag wrapped up with a rubber band does not take up much space in your camera bag.
  5. Don’t worry about a few drops of water on your camera. I don’t. A few drops on my equipment have never hurt anything – I just make sure that it doesn’t get completely wet. By keeping the camera mostly protected in the ways I’ve described above, my equipment has remained in good working order even if I shoot in rainy weather. Keep something soft and dry handy to wipe off the lens though, you will experience drips now and again!

Whatever you do – don’t just put the camera away when the clouds start rolling in. Enjoy the different photo opportunities that the rain provides.

Remember this motto – “When life gives you rain, take photos anyway!”

Filed Under: Exploring with a Camera, The Kat Eye View of the World Tagged With: Bath, England, Italy, Lucerne, Oregon, rain, Switzerland, umbrella, Venice

October 7, 2010 by Kat

Exploring with a Camera: Photo Essays

In the last year I’ve explored a vast range of art and photography. Visiting galleries, taking online classes, searching out photography blogs, looking at Flickr. What I’ve found, in all of that, is that my enjoyment of art, and especially photography, significantly increases with understanding of the back story… either the story of the artist or the story of the subject. It gives such a wonderful insight into the artwork that has been created, it’s like an additional dimension to the art itself.

I think that’s why I blog the way I do, and I’m attracted to other blogs with wonderful imagery and words. I want the story behind the image, along with the image. I connect with it in a deeper way, and I want you to find that here as well.

So today for Exploring with a Camera I want to talk about Photo Essays – which are beyond even what I normally do on my blog.  Yesterday’s post Camaraderie of Beer on Oktoberfest is an example of a photo essay, or my earlier post The Story of the Rooftops on Dubrovnik. There are times that a story needs to be told, and it takes more than one photo and a few sentences to tell.

You might ask, isn’t just a regular blog post, with several photos and text, a photo essay? Maybe, maybe not. I’ve read a lot of blog posts, but only a small few that I would categorize as a photo essay.  Two that stand out in my mind are Kirstin’s post Where I Live on the Mortal Muses More Musing site, and Patty’s post The Down Side on her blog, Nomadic Notebook.
A photo essay takes a few photos, combined with words, to tell a specific story of a time, a place, an experience, a piece of history. It has impact. It is basically photojournalism, but with a personal twist, by my definition. While you want to convey the information, you also want to convey the feeling you might have had. Why the story or experience is important to you, why you felt it needed to be told. In a photo essay, you focus on a specific point with your photos and words. Every photo tells a piece of the story, every word needs to be there. It’s not just the best photos of the day, but the ones that are needed to support the story.

So, how do you go about creating a photo essay? Here are a few tips:
1. Decide the story you want to tell. Be specific for the best impact. For example, I didn’t want to try to tell whole the story of Oktoberfest – that’s too big for just a few photos, I would lose the impact. So I took one aspect I noticed, the camaraderie in the beer drinking, and focused on that.
2. Choose your supporting photos. In some cases, you might have the idea in your head as you take the photos, which is what I did for my Oktoberfest essay. In other cases the story might develop as you review past photos, which is what happened for my Dubrovnik essay. Go through your photos, pick all of the ones that seem to apply. And then narrow down. Narrow down again. Make sure that each photo is essential to the story you are telling – try to get it down to 3 to 5 photos if you can. As I mentioned above, pick the best photos for the story, not just the best photos of the day. If they don’t help tell the story, save them for something else.
3. Write the essay, inserting the photos. You might find that you have to switch them around from your original idea slightly or you need to choose a different photo for the story to flow. That’s ok!  It doesn’t have to be long, just get the main story written with the photos inserted.
4. Edit. Step back and read it, making edits. Read it again. Take out anything that doesn’t flow or support your point. It might be a great idea or photo or brilliantly written sentence, but it has to fit the story. Do with your words what you did with your photos – narrow down.
5. Publish! Share that photo essay with the world. The world needed to see it, or you wouldn’t have had the idea in your head. If you ever see or feel a story that needs to be told, follow that urge to conclusion and then see what comes back. You just never know!

Not so many photos today, but I hope that this post has inspired you to look at how you can combine your images with words to great effect, or to notice how others create an impact using the photo essay. Come back next Thursday to share your view and link in to any photo essays of your own, past or present. Or link in to ones that you have found on the web, that have impacted you in some way. You can post your photo essay images to the Flickr pool too – I’ll be watching for them there!

Note: This post is part of the Exploring with a Camera series, published every two weeks. See all past exploration topics here.

Filed Under: Exploring with a Camera, The Kat Eye View of the World Tagged With: Croatia, Dubrovnik, photo story, photography

« Previous Page
Next Page »
  • Email
  • Facebook
  • Instagram
  • RSS

Resources

search

Archives

Filter

© Copyright 2017 Kat Eye Studio LLC